Thursday, October 30, 2008

पनीर - Paneer

Paneer in English

Indian Cheese, Homemade Paneer, Paneer kase banvave, how to make Paneer Cheese at home
साहित्य:
१/२ गॅलन दूध (होल मिल्क)
२ टेस्पून व्हिनेगर किंवा लिंबाचा रस
१ सुती कपडा किंवा मस्लिन क्लॉथ
१ चाळणी किंवा कोलँडर

कृती:
१) एक जाड बुडाचे पातेले घ्यावे. त्यात दूध ओतून मध्यम आचेवर दूध उकळवायला ठेवावे.
२) दुध वाफाळले कि मोठ्या चमच्याने ढवळावे. दुध पातेल्याच्या तळाला चिकटणार नाही याची काळजी घ्यावी. दुध वाफाळले कि आच मिडीयम लो वर ठेवून त्यात १ टेस्पून व्हिनेगर हळूहळू घालावे. एकाच वेळी सर्व व्हिनेगर घालू नये, थेंबथेंब करून सर्व ठिकाणी व्हिनेगर घालून ढवळत राहावे. दुध फाटण्याची क्रिया सुरू झाली कि गॅस एकदम मंद करावा आणि व्हिनेगर घालून ढवळत राहावे. हळूहळू चोथा आणि पाणी वेगळे होईल. गॅस बंद करावा. पाण्याचा पांढरट रंग गेला कि समजावे पनीर गाळण्यासाठी तयार आहे.
३) पाणी आणि पनीर वेगळे झाले कि सुती कपडा चाळणीत पसरवून ठेवावा आणि चाळणीच्या खाली पाणी जमवण्यासाठी पातेले ठेवावे. पनीरचे ग्रॅन्युल्स कपड्यातच ठेवून गार पाण्याखाली हलक्या हाताने धुवून घ्यावे, म्हणजे व्हिनेगरचा वास जाण्यास मदत होते.
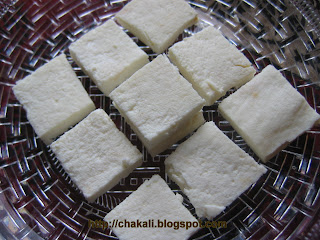
४) पनीर साधारण १/२ तास टांगून ठेवावे. नंतर गच्च चौकोनी आकारात बांधून घ्यावे म्हणजे पनीरची घट्ट अशी वडी बनेल आणि छान क्युब्ज कापता येतील.
५) एखादा प्लेन सरफेस (पोळपाट, फळी, कटींग बोर्ड) तिरका ठेवावा व त्यावर बांधलेले पनीर ठेवावे आणि बांधलेल्या पनीरवर एखादी जड वस्तू ठेवावी (वरवंटा). जड काही नसेल तर कूकरमध्ये पाणी भरून झाकण लावावे आणि कूकर पडणार नाही अशा रितीने ठेवावे. पनीर तिरक्या पोझिशनमध्ये ठेवल्याने त्यातील अधिकचे पाणी निघून जाईल. जर काही लाकडी वस्तू प्लेन सरफेस म्हणून वापरणार असाल तर त्यावर प्लास्टिक किंवा अल्युमिनीयम फॉईल ठेवावी नाहीतर लाकूड तसेच पनीर खराब होवू शकते.
६) ६ ते ७ तासात पाणी निघून जाते आणि पनीरची छान वडी तयार होते.

टीप:
१) सुती कपडा एकदम घट्ट विणेचा असु नये नाहीतर गाळताना निट गाळले जात नाही, पाणी पुर्ण वाहून जात नाही.
२) लिंबाचा रस थोड्या पाण्यात मिसळून ते पाणी गरजेपुरतेच वापरावे. लिंबाचा रस जास्त घातला गेला तर पनीरला लिंबाचा स्वाद लागू शकतो.
३) गाळलेले पाणी बाटलीत भरून रेफ्रिजरेट करून नंतर पनीर बनवताना व्हिनेगरऐवजी वापरता येते.

Labels:
Paneer Recipe, how to make Indian Paneer Cheese, Homemade Paneer

How to make Paneer

Paneer in Marathi

Ingredients:
1/2 Gallon Milk (whole milk)
2 tbsp White Vinegar or Lemon Juice
1 Muslin Cloth (Cheese Cloth)
1 Colander

homemade Paneer, How to make Paneer from Scratch, Quick and easy recipe of Paneer, Milk Paneer, Hight protein recipe, healthy recipe, Milk products, Indian Cheese
Method:
1) Take a heavy bottom Pan. Pour Milk in it and heat it on medium flame.
2) You will see milk is hot and steamy, start stirring with spoon. Otherwise, it will stick to bottom of the pan. keep the heat on medium low. First add 1 tbsp Vineger. Do not add all at a time. Swirl and drop all over the milk so that it will get spread everywhere. Stir nicely. Once milk starts curdling, turn off the heat and add remaining Vinegar. Keep stirring. Gradually, water and milk fat content separates.
3) Once milk is curdled, Place and spread a Muslin cloth in colander. Place Colander in a big vessel to store drained water. Pour curdled milk, separate solid Milk Particles and store drained water (Note 3). Wash these particles gently with running cold water, it will help to remove Vinegar's smell. While washing keep these granules in the cloth and let the water drain.
4) Hang milk solid granules for about 30 minutes. Then sqeeze tight to remove exessive water.
5) To make thick slab of Paneer, take a flat surface (eg. Cutting board). Place it into little slanting position. Put sqeezed Paneer cheese (with cloth) over it and place a heavy substance to create pressure on Paneer. This helps to remove water completely from Paneer and then you will get a nice block of Paneer Cheese. If you dont have any heavy substance, fill water in a pressure cooker, close the lid and use it as a weight. Be careful while doing it, otherwise water would spill out.
6) Within 6-7 hours, excessive water drains out and you will get nice Paneer slab to make delicious Paneer recipes.

Note:
1) If you are using cloth which is available at home, try to use very thin cloth and whose weaves are not too tight. If there are tight weaves, water wont drain out properly.
2) If you are using Lemon Juice to curdle milk, add little water to it and add this mixture slowly to hot milk. Do not overuse it, otherwise Paneer might get Lemony sour flavor.
3) Store this drained water in a Glass airtight container and refrigerate it. If you are going to make Paneer within a week, use it as Vinegar or Lemon Juice to curdle milk.

Friday, October 24, 2008

Gemma Booth Photography

गुलकंद बर्फी Gulkand Barfi

Gulkand Burfi in English

वाढणी: साधारण १० ते १२ वड्या

diwali sweets, indian sweets, mithai, rasmalai, Milk Sweetsसाहित्य:
सव्वा कप खवा ( रिकोटा चिजपासून खवा)
१/४ ते १/२ कप साखर
३ टेस्पून गुलकंद
१ टिस्पून तूप

Diwali, Faral, Sweets, quick recipe, Mithai Box, Indian Food, Healthy foodMithai, Pedha, barfi, sweets, Indian Diwali Festival Food


कृती:

१) रिकोटा चिजपासून खवा बनवण्याची कृती
२) १/२ टिस्पून तूप नॉनस्टिक पॅनमध्ये गरम करावे. त्यात खवा मध्यम आचेवर भाजून घ्यावा. साधारण ६-७ मिनीटे. नंतर त्यात साधारण १/४ ते १/२ कप साखर घालून मिक्स करावे. साखर अंदाज घेतघेत घालावी कारण गुलकंदातही साखर असते. अशावेळी चमचा साखर घालावी आणि चव घेवून पाहावे. मंद आचेवर मिश्रण दाटसर होवू द्यावे.
३) खवा घट्टसर झाला कि गॅस बंद करावा. अंदाजे १/३ मिश्रण काढून घ्यावे. पोळपाटाला किंवा एका ताटाला तूपाचा हात लावून त्यावर हे मिश्रण चौकोनी आकारात साधारण १ सेमी उंचीचे थापावे. वार्‍यावर थंड होवू द्यावे.
४) उरलेल्या २/३ खव्यात २-३ टेस्पून गुलकंद घालून निट मिक्स करावे. मंद आचेवर २-३ मिनीटे परतावे. या मिश्रणाचा गोळा हाताळण्यायोग्य झाला कि चौकोनी आकारात थापलेल्या खव्याच्या वर त्याच आकारात गुलकंदयुक्त खवा थापावा.
थंड झाले कि वड्या पाडाव्यात.

टीप:
१) मी वापरलेले गुलकंद वेलचीयुक्त होते म्हणून मी खवा परतताना वेलची घातली नव्हती. जर गरज वाटल्यास वेलची घालावी.
२) वड्या थापताना खुप तूप वापरू नये नाहीतर वड्या खुप तूपकट होतात.
३) मिश्रण थापताना हाताला खुप गरम लागत असेल तर जाडसर प्लास्टिकच्या तुकड्याला थोडे तूप लावून मिश्रण थापण्यासाठी वापरावा.

Labels:
Gulkand Barfi, Burfi mithai recipe, sweets Indian, Diwali Sweets

Gulkand Burfi

Gulkand Barfi in Marathi

Servings: Approx 12 pieces

gulkand burfi, Indian sweets, Gulkand sweets, Indian Mava burfi, Indian khava barfi, Mithai recipe
Ingredients:
1 1/4 cup Khoya, Crumbled (Khoya from Ricotta Cheese)
1/4 to 1/2 cup Sugar
3 tbsp Gulkand
1 tsp Pure Ghee

God, Mithai recipe, top secret recipe, Indian food, sweets


Method:
1) How to make Khoya from Ricotta Cheese
2) Heat a nonstick skillet, add 1/2 tsp Ghee. Roast crumbled Khoya on medium heat for about 6-7 minutes. Now add sugar and mix well. First add 1/4 cup of sugar. Let the sugar get absorbed in Khoya. Now taste a little part of it and add more sugar, only if needed. Keep stirring. Let the mixture cook on medium low heat until it forms a nice ball.
3) Once mixture becomes thick, turn off heat. Grease a plate only in the centre (Grease around 4 inch X 4 inch area)
Take out approxiamtely 1/3 of mixture and put it over greased area. Pat and make 1 cm layer. Layer should be evenly spread. Try to give Square shape to this layer, It makes easy to cut square pieces. Let this mixture cool down.
4) Add 2 to 3 tbsp Gulkand into remaining 2/3 mixture of Khoya. Put it on low heat. Stir and mix nicely. Stir for 2-3 minutes and turn off the heat.
One this mixture is warm enough to handle, put it on the Plain Khoya Layer and spread evenly over it. Do it very carefully, otherwise layers could get disturbed.
After sometime, Layers will cool down. Now cut into pieces. Serve fresh or store for 2-3 days into refrigerator.

Note:
1) I used Cardamom flavored Gulkand for this Mithai, that is why I dint use Cardamom Powder. If you want to give more flavor of Cardamom, add 2-3 pinch with Sugar.
2) Don't use too much ghee, otherwise Mithai will become very Buttery and glazy.
3) If the mixture is too hot to handle, take a thick plastic sheet, grease one side with Ghee and put otherside on your palm. Pat the layer with greased side of Plastic sheet.

Labels:
Gulkand Burfi, Indian Sweets, Diwali sweets, homemade sweets, how to make mithai

Wednesday, October 22, 2008

रिकोटा चिजपासून खवा - Khava from Ricotta Cheese

Khava from Ricotta Cheese in English

साहित्य:
४२५ ग्राम रिकोटा चिज
१/२ टिस्पून तूप

कृती:
नॉनस्टीक पॅनमध्ये तूप घालावे, तूप पातळ झाले कि रिकोटा चिज घालावे. अगदी मध्यम आचेवर परतावे. सुरूवातीला चिज पातळ होते. रिकोटा चिज सारखे ढवळत राहावे, तळाला चिकटणार नाही याची काळजी घ्यावी. हळूहळू रिकोटा चिज घट्ट होवून त्याचा खवा तयार होतो. या कृतीत रिकोटा चिज आळत जाते. मी खवा केला तेव्हा ४२५ ग्राम रिकोटा चिजचा २०० ग्राम खवा तयार झाला होता. या कृतीला अंदाजे २५-३० मिनीटांचा कालावधी लागतो. खवा थंड झाला कि मळून घ्यावा.

खव्यापासून बनवलेले पेढे आणि मावा कुल्फी

pedha, Indian Sweets, Peda, Pedhe, malai pedasweets, Indian mithai, mithai recipe, kulfi, Indian Icecream recipe, Indian dessert


Labels:

Khava, Khoya, Khawa recipe, how to make Khava from Ricotta cheese

Khoya from Ricotta Cheese

How to make Khoya from Ricotta Cheese in Marathi

Ingredients:
425 Gram Ricotta Cheese
1/2 tsp Pure Ghee

Method:
Heat a nonstick pan. Add 1 tsp Ghee and Ricotta Cheese. Stir on medium heat. Within 2-3 minutes, it will start melting and after 10-15 minutes, it will start thickening. Keep stirring, otherwise Ricotta cheese could stick to the pan. Slowly, it will become thick; it takes approximately 25-30 minutes. In this process, liquid content in Ricotta cheese evaporates and starts converting into Khoya. Khoya (Thickened Ricotta Cheese) should be thick in consistency and should form a ball. Knead this khoya gently after it cool down.

Food Items made by using Khoya - Pedha sweets and Mava Kulfi

sweets, indian sweets, indian pedha, mithai, burfi recipemava kulfi, malai kulfi, badam kulfi, indian icecream, almond icecream, indian dessert, cold dessert


Labels:

Khava, Khoya, Khawa recipe, how to make Khava from Ricotta cheese, Mava, Ricotta cheese khoya, Ricotta cheese sweets

Monday, October 20, 2008

Steve Carter Photography

Eleanor Hardwick - Photography

Eleanor Hardwick is a 16 year old photographer from Oxford, UK.


Eleanor Hardwick Photography

Technorati Tags: , , , ,

मक्याचा चिवडा - Corn Flakes chivda

Corn Flakes Chivda in English

वाढणी: साधारण ८ कप

divali gifts, diwali chivda, corn flakes recipe, snacks from breakfast cereals, marathi recipe of corn chivda, Corn Cereal chiwda, Diwali Faral, ladu chivda

साहित्य:
७ कप कॉर्न फ्लेक्स (Plain) (टीप ३,४ पहा)
१/४ कप तेल
फोडणीसाठी: १/२ टिस्पून मोहोरी, १/२ टिस्पून जिरे, १/४ टिस्पून हिंग, १/२ टिस्पून हळद, १ टिस्पून लाल तिखट, ६-७ पाने कढीपत्ता
६-७ हिरव्या मिरच्या, बारीक चिरून
२/३ कप शेंगदाणे
१/४ कप बेदाणे
२ टिस्पून धणे-जिरे पूड
१ टेस्पून आमचूर पावडर
मिठ आणि साखर चवीनुसार

कृती:
१) मोठ्या पातेल्यात १/४ कप तेल गरम करावे. त्यात शेंगदाणे फ्राय करून घ्यावे. शेंगदाणे एका ताटलीत काढून ठेवावेत.
२) आच मध्यम करावी. गरम तेलात मोहोरी, जिरे, हिंग, हळद, लाल तिखट आणि हिरव्या मिरच्या घालून फोडणी करून घ्यावी. कढीपत्ता घालून तडतडू द्यावा. बेदाणे घालावेत काही सेकंद परतून शेंगदाणे आणि कॉर्नफ्लेक्स घालावेत. कॉर्नफ्लेक्स ६-७ भागात घालावेत. एकदम घालू नयेत, जेणेकरून तेल सर्व कॉर्नफ्लेक्सना लागेल.
३) गॅस एकदम मंद ठेवून चिवडा निट मिक्स करून घ्यावा. आता धणे-जिरेपूड, आमचूर पावडर, मिठ आणि साखर (मी ३ टिस्पून साखर वापरली होती) घालून मिक्स करावे.
जर नॉनस्टिक भांडे वापरत असाल आणि भांड्याला कान असतील तर दोन्ही कान पकडून चिवडा सांडू न देता सावकाशपणे पाखडावा. म्हणजे सर्व जिन्नस छान मिक्स होतील.
४) गॅस बंद करून चिवडा निवू द्यावा. चिवडा निवला कि हवाबंद डब्यात भरून ठेवावा.

टीप:
१) शेंगदाण्याप्रमाणेच सुक्या खोबर्‍याचे पातळ काप आणि चण्याचे डाळं तळून चिवड्यात वापरू शकतो.
२) जर मिरच्या वापरायच्या नसतील तर फक्त लाल तिखट वापरू शकतो.
३) काही सिरीयल्स (cereal) पातळ तर काही जरा जाड असतात (मी आणलेल्या सिरीयल्स पातळ होत्या). त्यावरती तेल किती लागेल हे अवलंबून असते, म्हणून एकावेळी सर्व सिरीयल्स तेलात न घालता एकेक कप घालावेत.
४) सिरीयल्समध्ये साखरेचे प्रमाण कमीतकमी असावे, तेव्हा सिरीयल (cereal) निवडताना खोक्यावर ’Nutrition Label' वर साखरेचे प्रमाण बघुन घ्यावे. शुगर फ्रोस्टेड सिरीयल्स (Sugar Frosted Cereals) वापरू नयेत. त्यामुळे चिवडा खुप गोड होईल.

Labels:
Corn flakes chiwada, Diwali Chivda recipe, Makyacha Chivda, Makai Chivda

Corn Flakes Chivda

Corn Flakes Chiwda in Marathi

Serves: Approx 8 cup

divali gifts, diwali chivda, corn flakes recipe, snacks from breakfast cereals, marathi recipe of corn chivda
Ingredients:
7 Cups Plain Corn Flakes (See Note 3, 4)
1/4 cup Oil
For Tempering:
1/2 tsp Mustard Seeds, 1/2 tsp Cumin seeds, 1/4 tsp Asafoetida Powder, 1/2 tsp Turmeric Powder, 1 tsp Red Chili Powder, 6-7 Curry leaves
6-7 Green Chilies, finely Chopped
2/3 cup Peanuts
1/4 cup Golden Raisins
1 tsp Coriander Powder
1 tsp Cumin Powder
1 tbsp Amchoor Powder (Dry Mango Powder)
Salt and sugar to taste

Method:
1) Heat 1/4 cup Oil in a Big nonstick pan. Add peanuts and fry till they become light brown. Drain and transfer them to a plate.
2) Turn heat on medium. Temper remaining Oil with Mustard seeds, Cumin seeds, Asafoetida Powder, Turmeric Powder, Red Chili Powder and Green chilies. Add Curry leaves and let it crackle. Then add Raisins, stir for few seconds and add fried Peanut. Also add Corn Flakes. Add 1 cup Corn flakes at a time. Do not add whole quantity of Corn Flakes. Adding in small portions will help to spread seasoning evenly.
3) Turn heat on Low and mix Chiwda nicely. Now add Coriander-Cumin Powder, Amchoor Powder, salt and sugar (I had added 3 tsp sugar) to taste. Mix well with bigger spoon.
Hold handles of the pan and toss gently to mix all the ingredients nicely. Do not try if you are not confident.
4) Turn off the heat. Transfer the pan to any other place. Do not keep it on hot Coil, otherwise Chiwda at the bottom could get burn.
5) Once Chiwda is cooled, store it to Airtight Container.

Note:
1) To enhance the taste, fry Dry coconut pieces and Chana (Not dried one) Dal with Peanuts.
2) You can use only Red chili Powder if you dont want to use Green chilies.
3) Some Corn Flakes are little thick some are thin. Amount of Oil required is depend on the thickness of Corn Flakes. So do not add entire amount of Flakes in one time. Add one cup at a time.
4) Sugar content in the Cereals should be very less. So check the 'Nutrition Label' on the pack of Cereals. Do not use Sugar Frosted cereals, It will make chiwda sweeter than required.

Labels:
Chivda, Corn Chiwda, Diwali Chivada recipe, Makyacha Chiwda, Makai Chivda

Friday, October 17, 2008

Photography of Daryl Banks

How to make Karanji

How to make Karanji

Karanji Recipe नारळाची करंजी in Marathi Coconut Karanji English

Step by step images:-

Roll and make thin disc

karanji faral, gujia, diwali festival sweets
Put a spoonful Coconut filling on one half of the disc. Apply very little milk on the edge of Half disc where you have put the mixture


Fold and Seal

karanjya, gujia, diwali sweets
Decorate with Fork or Cut excessive dough with Karanji Cutter

diwali sweets, faral, pakwanna, diwali gifts
Deep fried Karanjies


Karanji, Karanji Filling

Labels:
Diwali Faral, Karanji, olya naralachya Karanjya

Thursday, October 16, 2008

ओल्या नारळाच्या करंज्या - Karanji

Coconut Karanji in English

वाढणी: साधारण ११ करंज्या
वेळ: साधारण १ तास
Diwali Faral, Karanjya, Olya Naralachya Karanjya, Coconut Karanji, Gujia, how to make karanjiदिवाळीसाठी ड्रायफ्रुट बेक करंजी

साहित्य:
::::सारण::::
सव्वा कप खोवलेला ओला नारळ
पाउण कप किसलेला गूळ
१/२ टिस्पून वेलची पूड
::::करंजी पिठ::::
पाउण कप मैदा
पाव कप रवा
१ टिस्पून साजूक तूप, पातळ केलेले
१/२ ते पाउण कप दूध
तळण्यासाठी तेल

कृती:
१) गूळ व नारळ एकत्र करून पातेल्यात, मध्यम आचेवर शिजवावे. वेलचीपूड घालावी आणि घट्टसर मिश्रण करावे. मिश्रण ओलसर असू नयेत नाहीतर करंज्या नरम पडतात.
२) करंजीच्या आवरणासाठी एका भांड्यात रवा आणि मैदा एकत्र करावा. तूप कडकडीत गरम करून मोहन घालावे. थोडे थंड झाले कि मोहन घातलेले तूप सर्व मैद्याला लागेल असे मिक्स करावे. अंदाजे घेत घेत गार दूध घालावे आणि घट्ट मळून घ्यावे. थोडा वेळ झाकून ठेवून द्यावे.
३) १५-२० मिनीटांनी थोडे दूधाचा हबका मारून पिठ जरा कुटून घ्यावे. पिठाचे एकेक इंचाचे गोळे करून घ्यावेत.
४) करंज्या वाळू नयेत म्हणून एक ताटली आणि एक ओला, पिळून घेतलेला कपडा तयार ठेवावा.
५) करंज्या करण्यासाठी पिठाची एक गोळी निट मळून घ्यावी. गोल आणि पातळसर पुरी लाटून घ्यावी. मध्यभागी एक चमचाभर नारळाचे सारण ठेवावे. पुरीच्या अर्ध्या कडेला किंचीत दूध लावावे म्हणजे दोन्ही कडा निट चिकटतील आणि तळताना करंजी फुटणार नाही. उरलेली रिकामी अर्धी बाजू दूध लावलेल्या बाजूवर आणून चिकटवावी. सारण बाहेर येणार नाही याची काळजी घ्यावी. कातणाने अधिकचे पिठ कापून घ्यावे. [माझ्याकडे कातण नव्हते म्हणून काट्याने (Fork) कडेवरती थोडे डिझाईन केले.]
६) करंजी करून झाली कि ती ताटलीत ठेवून वरून ओला कपडा टाकून झाकावी म्हणजे करंजी सुकणार नाही. अशाप्रकारे सर्व करंज्या करून घ्याव्यात.
७) तळणीसाठी तेल गरम करावे. मध्यम आचेवर करंज्या सोनेरी रंगावर तळून घ्याव्यात.

Labels:
Olya Naralachya Karanjya, Karanji recipe, Gujia Recipe, nevri, karjikayi, karanji

Karanji for Diwali

Olya Naralachya Karanjya in Marathi

Serves: 10 to 12 Karanjis
Time: Approx 1 hour

Karanji, Karanjya, Gujia, Diwali Faral, Diwali Karanji RecipeBaked Karanji with Dryfruits for Diwali

Ingredients:
::::Filling::::
1 1/4 cup Fresh grated Coconut
3/4 cup Jaggery, grated
1/2 tsp Cardamom Powder
::::Karanji Dough::::
3/4 cup Maida (All purpose Flour)
2 tbsp Semolina
1 tsp Pure Ghee
1/2 to 3/4 cup Milk, cold or at room temperature
Oil for deep frying

Method:
1) Take a pan, add Coconut and Jaggery and cook for 5 minutes on medium heat. Stir occasionally. Add Cardamom powder and mix well. Mixture should be thick in consistency, otherwise, Karanji gets mushy because of filling.
2) Mix Maida and Semolina in a bowl. Heat 1 tsp Ghee in a small saucepan. and pour hot Ghee in Maida and Semolina mixture. Mix with spoon and wait for 2-3 minutes. Add milk and make medium consistency dough. Cover the dough with lid and set aside for 15 minutes.
3) After 15-20 minutes, Dough will be little hard. Sprinkle little milk and knead dough nicely. Make 1 inch balls out of this dough.
4) Now we will make karanjis. Before starting to make Karanji, keep ready a medium sized plate and clean, damp cloth to cover Karanjis. Damp cloth keep Karanjis moist.
5) How to Make Karanji
Take one ball of dough. Squeeze and knead a little. Roll and make thin disc. put a spoonful Coconut filling on one half of the disc. DO NOT put mixture on the edges. Apply very little milk on the edge of Half disc where you have put the mixture. Now fold the empty side of the disc over mixture and seal nicely.
If you Have Karanji Cutter.
Cut the excessive dough with Karanji cutter. Do not cut very close to stuffed Coconut filling, otherwise Karanji will get open and it will double your work to patch it up. Also Shape of Karanji will not be proper.
If you dont have Karanji Cutter
Make design with Fork or just twist the edges.
6) After making one Karanji, put it on the plate and cover with damp cloth, so that it will not get dry. Make all Karanjis one by one and place under damp cloth.
7) Heat oil for deep frying. Heat should be on medium. Deep fry Karanjis until nice golden color.

This is my entry for Diwali Festival Event by Pallavi

Labels:
Diwail Special Faral, Karanji, Olya naralachya Karanjya, Coconut Karanji

Wednesday, October 15, 2008

Kothimbir Wadi

Kothimbir Vadi in Marathi

kothimbir wadi, cilantro snacks, cilantro fried cakes, corinader wadi, coriander pakodaIngredients:

3 bunches of Cilantro, (picked, washed and finely chopped)
1 and 1/4 cup of Chickpea flour
1 cup water
1 tbsp Rice flour
7 to 8 Garlic cloves
1 inch ginger piece, grated
6 to 7 green chilies
1 tsp Turmeric powder
1 tsp cumin seeds
2 tbsp Oil
Salt to taste

Method:
1) Make paste of ginger, garlic and green chilies. keep ready the cilantro.
2) Mix chickpea flour, water and rice flour. Mix nicely and make a smooth batter. Add salt to taste. Keep the batter lump-free.
3) Heat a pan. Add oil wait till heated. Add turmeric, cumin and ginger-garlic-chili paste. Stir and add chopped cilantro and saute for 1 minute. Turn the heat over medium. Now add the chickpea batter and stir vigorously. If you stop stirring lumps can be form. Stir until mixture becomes thick. Cover the pan let the mixture cook. Stir occasionally to avoid burning.
4) Mixture should become nicely thick. It will take approx 8 to 10 minutes. To check the consistency, insert the spatula vertically in the batter. it should stand. Turn off the heat.
5) Grease pan plate or baking square pan. Let the mixture cools down a little. Spread the mixture evenly, pat with fingers and make even layer. Let it cool down. Then cut into diamonds or any shape you wanted.
Deep fry or shallow fry the vadis.
serve them hot with green chutney.

Labels:
Kothimbir Wadi, Cilantro Wadi, Cilantro Savory Snack

Tuesday, October 14, 2008

सोया ग्रॅन्युल्स कटलेट - Soya Cutlet

Soya Granules Cutlet in English

Cutlet, Soya Cutlet, Healthy Cutlet, Vegetable Cutlet, Indian Snack, Savory Snack, Tea time snack
साहित्य:
१ कप न्युट्रेला सोया ग्रॅन्युल्स
(मी रूची ब्रँडचे सोया ग्रॅन्युल्स वापरले होते)
१ कप उकडलेला बटाटा, किसून
१/२ कप वाफवलेले मटार
१ किसलेले गाजर
७-८ वाफवलेली फरसबी, बारीक चिरून
१/२ कप बारीक चिरलेली कोथिंबीर
१ टिस्पून जिरेपूड
१/४ कप कांदा, पातळ उभा चिरून
१ टिस्पून आले पेस्ट
५-६ हिरव्या मिरच्या, बारीक चिरून
६-७ कढीपत्ता
२ टेस्पून बेसन
१ टिस्पून तेल
चवीनुसार मिठ
१/२ कप भाजलेला रवा
शालो फ्राईंगसाठी तेल

कृती:

१) ३ ते ४ कप पाणी उकळत ठेवावे. त्यात १ टिस्पून मिठ आणि १ कप न्युट्रेला ग्रॅन्युल्स आणि घालून ५ मिनीटे मध्यम आचेवर उकळवावे. नंतर हे ग्रॅन्युल्स चाळणीत काढून १० मिनीटे निथळत ठेवावे. १-२ वेळा थंड पाण्याने धुवून घ्यावे. पाणी निथळून गेले कि ग्रॅन्युल्स हाताने पिळून घ्यावेत. पाणी राहू देवू नयेत.
२) नॉनस्टिक पॅनमध्ये १ टिस्पून तेल गरम करावे त्यात कढीपत्ता, हिरव्या मिरच्या, आले पेस्ट घालावी. काही सेकंद परतून कांदा घालावा. कांदा परतला गेला कि त्यात बेसन घालून मंद आचेवर परतावे. बेसन निट परतले गेले कि हे मिश्रण दुसर्‍या वाडग्यात काढून ठेवावे.
३) एका मोठ्या भांड्यात शिजवलेले ग्रॅन्युल्स, उकडलेला बटाटा, वाफवलेले मटार, किसलेले गाजर, फरसबी, कोथिंबीर, जिरेपूड, बेसनाचे मिश्रण आणि चवीपुरते मिठ घालून मिक्स करावे. वाटल्यास थोडे लाल तिखट घालावे. निट मिक्स करावे.
४) वरील मिश्रणाचे मध्यम आकाराचे चपटे कटलेट करावे. भाजलेल्या रव्यामध्ये घोळवून, मध्यम आचेवर हे कटलेट शालो फ्राय करावेत.

टीप:
१) जर लसणीचा फ्लेवर आवडत असेल तर १/२ टिस्पून लसणीची पेस्ट फोडणीत घालावी.
२) भाजलेल्या रव्याऐवजी कोटींगसाठी ब्रेड क्रम्ससुद्धा वापरू शकतो.

Labels:
Nutrela Granules, Soya Granules Cutlet, Healthy Cutlet

Soya Granules Cutlet

Soya Granule Cutlet in Marathi

Serves: approx 15 medium Cutlets

Cutlet, Soya Cutlet, Healthy Cutlet, Vegetable Cutlet, Indian Snack, Savory Snack, Tea time snack, low calorie food, High fiber food, indian restaurant
Ingredients:
1 cup Soya Granules
(I had used Ruchi Brand Nutrela Soya Granules)
1 cup boiled and mashed Potato
½ cup Steamed Peas
1 Carrot, Grated
7-8 French Beans, steamed small pieces
½ cup Cilantro, finely chopped
1 tsp Cumin Powder
¼ cup Red Onion, thinly sliced
1 tsp Ginger Paste
5-6 Green chilies, finely chopped
6-7 Curry leaves
2 tbsp Gram Flour
1 tsp Oil
Salt to taste
½ cup Roasted Semolina
Oil for shallow frying

Method:
1) In a saucepan, bring to boil 3-4 Cups of water. Add 1 tsp salt, and 1 cup Soya Granules. Simmer for 5 minutes on low heat. The strain the cooked granules and drain the water. Wash granule softly with cold water. Leave Granules to drain water for 10 minutes. Once water is drain, squeeze Granules and remove water as much as you can.
2) Heat 1 tsp Oil in a nonstick pan. Add Curry leaves, chopped green chilies, and Ginger paste. Sauté for few seconds. Add Onion and sauté until Onion become translucent. Once Onion is done, add Gram flour and stir on low heat until you smell sense nice smell of roasted Gram flour. Turn off heat and transfer roasted gram flour mixture to another bowl.
3) In a mixing bowl, add cooked granules, mashed Potato, steamed Peas, Grated Carrot, steamed French beans, Cilantro, Cumin Powder, Gram Flour Mixture and salt to taste. Mix nicely. Taste the mixture and add salt or Red Pepper to adjust flavor according to your taste.
4) Make medium and flat cutlet (patties). Spread roasted Semolina in a plate. Place 1 cutlet over it and Coat both the sides of Cutlet with roasted Semolina.
5) Grease nonstick pan with little oil. Place coated cutlets in the pan. Shallow fry them over medium low heat.

Note:
1) If you desire to give Garlicky flavor to Cutlets, add ½ tsp Garlic Paste in hot oil along with Ginger paste.
2) You can use Breadcrumbs instead of Roasted Semolina for coating.

Labels:
Veg Cutlet, Soya Granules Cutlet, Indian snack recipe, tea time snack, vegetable Cutlet, veg Pattice

Photography portfolio of Lilya Corneli

Photography by Lilya Corneli

Photography by Lilya Corneli

A somewhat unusual portfolio from Lilya Corneli.

About the photographer.

Technorati Tags: , , , , , , , , , , ,

Monday, October 13, 2008

Beautiful baby portraitature by Kelley Ryden


OK, here's something a little different for this blog, in Kelley Ryden's online portfolio there is page after page of tastefully shot little newborn babies. Absolutely glorious and quite a change from the photography usually posted here. Have a look.


Technorati Tags: , , , , , , , , , ,

Phillip Toledano Photography Portfolio

Jamie Baker Photography

Christopher Beyer Photography

HDR photographs of abandoned places around the world

Photos by Pavel Krukov

Nice portfolio from tigress-phan at DeviantArt


I have been browsing around DeviantArt recently and I have found some really nice work. In this portfolio there are some stunningly beautiful shots from tigress-phan at DeviantArt.


Technorati Tags: , , , , , ,