Thursday, October 29, 2009

Dudhi Halwa (Lauki Halwa)

Dudhi Halwa in Marathi

Time: approx 1 hour
Serves: 4 people (yield: around 1 and half to 2 cups)

halwa recipe, halva recipe, dudhi halwa, dudhicha halwa, lauki halwa, bottlegourd halwa, indian sweetsIngredients:
3/4 Kg Bottle gourd
1 and 1/2 cup milk
2 tsp Ghee
3/4 cup Khoya
3/4 cup Sugar
1/4 tsp Cardamom Powder
Dry fruits pieces (I used Chirounji, cashew, almonds)

Method:
1) Peel and grate bottle gourd. Squeeze out and reserve the water. Use reserved water for making soup, sambar or Dal.
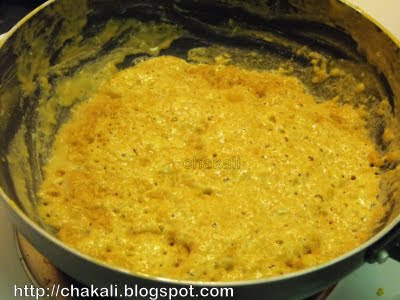
2) In a deep pan, heat 2 tsp Ghee. Add grated and squeezed bottle gourd and saute for 2 to 4 minutes. Then add 1 and 1/2 cup milk and let the bottle gourd cook over medium heat. Cover the pan while cooking.
3) Once milk is absorbed, check whether bottle gourd is cooked or not. If you get little rawness, add little milk and cook for some more time. Then add Khoya. Remove all the lumps from khoya.
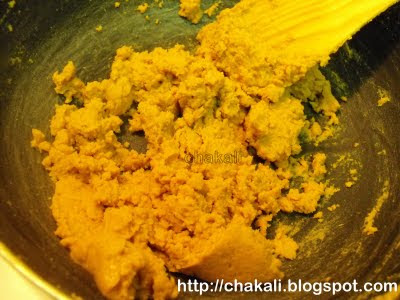
4) Five minutes after adding khoya, add sugar, cardamom powder, dry fruits and stir well. Keep the flame low. After adding sugar, halwa will become little watery. But within 5 to 7 minutes it will start thickening. Keep stirring until you get perfect consistency dudhi halwa.
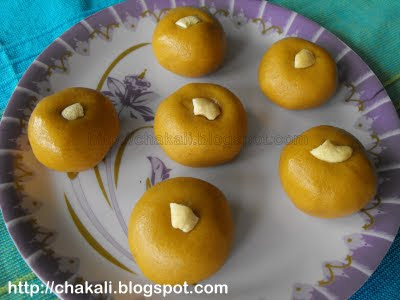
Serve Halwa hot or cold.

Note:
1) Bottle gourd should be fresh and seedless.
2) If you have leftover Pedha, use it instead of khoya. But reduce the quantity of sugar as pedha already have some sugar.

दुधी हलवा - Dudhi Halwa

Dudhi Halwa in English

४ ते ५ जणांसाठी (एकूण दिड ते दोन कप)
वेळ: साधारण १ तास

halwa recipe, halva recipe, dudhi halwa, dudhicha halwa, lauki halwa, bottlegourd halwa, indian sweetsसाहित्य:
पाऊण किलो कोवळा दुधी भोपळा (किंवा किसलेला दुधी अडीच कप)
२ टिस्पून साजूक तूप
दिड कप दुध
३/४ कप खवा (आवडत असल्यास थोडा जास्त घेतला तरी उत्तम)
३/४ कप साखर
१/४ टिस्पून वेलचीपूड
बदाम काजू तुकडे, चारोळ्या बेदाणे आवडीनुसार

कृती:
१) दुधीची साले काढून मध्यम किसणीवर किसून घ्यावा. किसलेला दुधी पिळून पाणी काढून घ्यावे. हे पाणी सूप, आमटी किंवा सांबारामध्येमध्ये वापरता येईल.
२) जाड बुडाच्या पातेल्यात तूप गरम करून त्यात किसलेला दुधी घालावा आणि दोनचार मिनीटे मध्यम आचेवर परतावा. नंतर त्यात दुध घालावे आणि मध्यम आचेवर पातेले झाकून शिजू द्यावे. मधेमधे ढवळावे.
३) दुध आटले कि दुधी व्यवस्थित शिजला आहे कि नाही ते पाहावे. लागल्यास थोडे दुध घालावे. खवा व्यवस्थित बारीक करून घालावा, गुठळ्या राहू देवू नयेत. जर गुठळ्या राहिल्याच तर कालथ्याने फोडाव्यात.
४) खवा घातल्यावर थोड्यावेळानंतर साखर, वेलचीपूड, सुकामेवा घालावा आणि ढवळावे. आच मध्यम ठेवावी. साखर वितळेल आणि दुधी हलवा घट्ट होईल. एकदम छान घट्ट झाले कि गॅस बंद करावा.
हलवा गरम किंवा गार कसाही छान लागतो.

टीप:
१) दुधी बिनबियांचा असावा तसेच कोवळा विकत घ्यावा.
२) जर घरात उरलेले पेढे असतील तर त्याची पावडर करून खवा म्हणून वापरू शकतो, फक्त साखरेचे प्रमाण कमी करावे लागेल.

Label:
Dudhi Halwa, Lauki Halwa, Bottlegourd Halwa

Tuesday, October 27, 2009

Bhajaniche thalipith

Bhajaniche Thalipith in Marathi

Time: 30 to 40 minutes
Serves: approx 4 medium Thalipith

bhajani thalipith, Bhajaniche thalipeeth, thalipeethIngredients:
1 cup Thalipith Bhajani
1 cup water
salt to taste
1 tsp red chili powder
1/2 tsp cumin seeds
2 pinch asafoetida
1/4 tsp turmeric
1 tbsp oil
1/4 cup finely chopped cilantro
1/2 cup finely chopped onion
1/4 cup Oil for roasting thalipith

Method:
1) To make a steam dough, heat 1 cup water, add red chili powder, salt, asafoetida, turmeric, cumin and 1 tbsp oil and stir. Once water starts boiling, turn heat to low. Add Bhajani and stir with spoon cover and let it cook over low heat for 5 minutes. Turn off the heat and let the dough cook over steam.
2) Knead the dough well, once it becomes lukewarm. Use some warm water if needed. Incorporate onion and cilantro while kneading. Let the dough rest for few minutes. Then make 4 to 5 equal balls (tennis ball size).
3) Take a thick plastic paper (approx 2 ft X 1 ft). Fold into half width-wise. Apply little water. Place one dough ball inside and roll to required thickness. If the edges are cracking, adjust with fingers. Thalipith should not be too thick or thin.
4) Heat tawa, add some oil and put rolled thalipith carefully. Cover and cook over medium heat. Cook both sides (atleast 2 to 3 minutes each side)

Note:
1) Steam cooking prevents the dough from sticking.
2) You can spread the bhajani dough on tawa with your fingers. But because of dents, sometimes thalipith doesn't get cooked evenly. Rolling is the easy way to cook thalipith evenly.
3) If you don't want to steam the dough, Add all the spices and other ingredient to Bhajani. Knead the dough by adding hot water. Let it rest for sometime and then make thalipith.

भाजणीचे थालिपीठ - Bhajaniche Thalipith

Bhajani Thalipith in English

साधारण ४ मध्यम थालिपीठे
वेळ: ३० ते ४० मिनीटे

bhajani thalipith, Bhajaniche thalipeeth, thalipeethसाहित्य:
१ कप थालिपीठाची भाजणी
१ कप पाणी
चवीपुरते मिठ
१ टिस्पून लाल तिखट
१/२ टिस्पून जिरे
२ चिमूट हिंग
१/४ टिस्पून हळद
१ टेस्पून तेल
१/४ कप चिरलेली कोथिंबीर
१/२ कप बारीक चिरलेला कांदा
१/४ कप तेल थालिपीठ भाजताना तव्यावर सोडण्यासाठी

कृती:
१) प्रथम भाजणीची उकड काढून घ्यावी त्यासाठी,
१ कप पाणी नॉनस्टिक भांड्यात उकळवण्यास ठेवावे. त्यात तिखट, मिठ, हिंग, हळद, जिरे, १ टेस्पून तेल घालून मिक्स करावे. पाणी उकळले कि गॅस मंद करून पाण्यात भाजणी घालावी आणि लगेच चमच्याने ढवळावे. थोडे मिक्स करून वरती झाकण ठेवून ५ मिनीटे मंद आचेवर वाफ काढावी. गॅस बंद करून वाफ अजून ५ मिनीटे मुरू द्यावे.
२) उकड थोडी कोमट झाली कि पाण्याचा हात लावून मळून घ्यावे. मळतानाच चिरलेला कांदा आणि कोथिंबीर त्यात घालून एकत्र करावे. थोडावेळ झाकून ठेवावे. नंतर ४ ते ५ मध्यम आकाराचे सारखे गोळे करून घ्यावे.
३) जाडसर प्लास्टिकचा तुकडा घ्यावा (२ फुट x १ फुट). लांबड्या बाजूकडून बरोबर अर्धा असा दुमडून घ्यावा. त्याला अगदी थोडा पाण्याचा हात लावावा. मधे १ भाजणीचा गोळा ठेवून वरती अर्धा प्लास्टीकच्या भागाने कव्हर करून लाटावे. कडेला जर भेगा पडत असतील तर बोटांनी जरा आत ढकलून सारख्या करून घ्याव्यात. मध्यम लाटावे.
४) तवा गरम करून तेल घालून त्यावर थालिपीठ घालून मध्यम आचेवर झाकण ठेवून दोन्ही बाजू खरपूस भाजून घ्यावे. (प्रत्येक बाजू साधारण २ ते ३ मिनीटे)
फक्त दह्याबरोबर किंवा दही-मिरची लोणच्याबरोबर आणि कैरी लोणच्याबरोबर थालिपीठ अप्रतिम लागते.

टीप:
१) उकड काढल्याने भाजणी चिकट होत नाही.
२) हाताने थापण्याऐवजी जर लाटण्याने लाटले तर दोन्ही बाजू प्लेन होतात आणि सर्व ठिकाणहून व्यवस्थित भाजल्या जातात.
३) बरेच जण तव्यावरच थालिपीठ थापतात, पण त्यासाठी तवा गार होण्याची वाट पाहावी लागते म्हणून लाटण्याची आयडिया उपयोगी पडते.
४) जर उकड काढायची नसेल तर भाजणीत इतर साहित्य घालून गरम पाण्याने पिठ भिजवावे आणि तव्यावर हाताने थापावे.

Labels:
Thalipith, Bhajaniche thalipeeth, bhajniche thalipith

Friday, October 23, 2009

Chinch-Gulachi Bhendi (Sweet sour Okra curry)

Sweet and sour Okra Curry in Marathi

Time: approx 35 minutes
serves: 3 to 4 people

chinch gulachi bhendi, bhendi curry, sweet and sour okra curryIngredients:
1/4 kg Okra
1 tbsp Oil
For tempering: 1/4 tsp Mustard seeds, 1/4 tsp Cumin seeds, 1/8 tsp Asafoetida, 1/4 tsp Turmeric powder, 1/2 tsp Red chili powder, 4 to 5 curry leaves
2 tbsp fresh scraped coconut
1 tbsp Jaggery or to taste
1 tbsp Peanuts powder
2 tsp Goda masala
salt to taste
Cilantro for garnishing

Method:
1) Wash Okra thoroughly. Pat dry and cut into rings.
2) Soak tamarind into warm water. after 15 minutes crush with finger and squeeze.
3) Heat a deep medium pan. Add oil and let it heat up. Temper with mustard seeds, cumin seeds, asafoetida, turmeric, red chili powder and curry leaves. Then add coconut and saute for few seconds.
4) Add Okra slices and saute for 2 minutes over medium heat. Add tamarind juice, salt and little water if needed. Cover and cook for about 10 minutes or until okra cooks nicely. Add water if needed.
5) Once Okra is cooked, add jaggery, Goda masala, and Peanuts powder. bring the curry to boil for couple of minutes.
Garnish with Cilantro, Serve hot with rice or Chapati.

Note:
1) Instead of pan cooking, you can pressure cook okra to save time. However, pan cooked okra taste way better than pressure cooked okra.

चिंचगूळातील भेंडी - Chinch gulachi Bhendi

Sweet Sour Okra Curry in English

३ ते ४ जणांसाठी
वेळ: साधारण ३५ मिनीटे

chinch gulachi bhendi, bhendi curry, sweet and sour okra curryसाहित्य:
पाव किलो भेंडी
१ टेस्पून तेल
फोडणीसाठी: १/४ टिस्पून मोहोरी, १/४ टिस्पून जिरे, १/८ टिस्पून हिंग, १/४ टिस्पून हळद, १/२ टिस्पून लाल तिखट, ४-५ कढीपत्ता पाने
२ टेस्पून खवलेला नारळ
मोठ्या लिंबाएवढ्या चिंचेचा कोळ
१ टेस्पून गूळ
१ टेस्पून शेंगदाणा कूट
२ टिस्पून गोडा मसाला
चवीपुरते मिठ
कोथिंबीर सजावटीसाठी

कृती:
१) भेंडी धुवून घ्यावी. स्वच्छ कपड्याने कोरडी करून गोल चकत्या करून घ्याव्यात.
२) चिंच पाण्यात भिजवून त्याचा कोळ करून घ्यावा. कोळात १ भांडे पाणी घालावे.
३) कढईत तेल गरम करून त्यात मोहोरी, जिरे, हिंग, हळद, तिखट आणि कढीपत्ता घालून फोडणी करावी. ताजा नारळ घालून काही सेकंद परतावा.
४) नंतर चिरलेली भेंडी घालून दोनेक मिनीटे मोठ्या आचेवर परतावे. त्यात चिंचेचे पाणी घालावे. मिठ घालावे आणि मध्यम आचेवर झाकण ठेवून भेंडी शिजेस्तोवर वाफ काढावी. गरज वाटल्यास पाणी वाढवावे.
५) भेंडी शिजत आली कि त्यात गूळ, गोडा मसाला, आणि शेंगदाण्याचा कूट घालून एक दोन वेळा उकळी काढावी.
कोथिंबीर घालून चिंचगूळाची भेंडी गरमागरम तूप भाताबरोबर वाढावी.

Labels:
Okra curry, Chinch gulachi bhendi

Wednesday, October 14, 2009

Rava Besan Laddu

Rava Besan Laddu in Marathi

Serves: 12 to 15 Laddus, medium sized
Time: 30 to 40 minutes. (sugar syrup soaking time excluded)

rava besan ladu, Maharashtrian Rava besan ladu, Ladoo recipe, diwali faralIngredients:
1 cup Semolina/ Sooji/ Rava (fine quality)
1/2 cup Besan
4 tbsp Ghee (Or according to your taste)
1 cup sugar
1/2 cup water
1/2 tsp Cardamom powder
Almond cashewnuts pieces

Method:
1) Dry roast Semolina over medium heat. Roast until it gets nice pinkish color. Another thing to remember is to stir continuously with spatula. If you roast over high heat, semolina will change the color in short time. However it will have raw taste.
2) After roasting semolina, transfer it to another plate. In that same pan, add some ghee, add besan and roast until you sense nice aroma of besan. Roast over medium heat and keep stirring. Add cashewnuts, almonds pieces.
3) In another heavy bottom pan, add 1 cup sugar and 1/2 cup water. Make one string consistency sugar syrup. To make that, turn on the heat and stir until sugar dissolves in water. After couple of minutes water will start boiling. First sugar syrup will become frothy on the surface, and in one minute froth will disappear. At that time turn the heat off and add this sugar syrup into mixture of semolina and besan. Stir for a minute and cover the plate. After 10-15 minutes again give a quick stir. Add cardamom powder. Stir until Rava-besan mixture absorbs maximum sugar syrup. Then make laddus.

Note:
1) Sugar syrup should be of perfect consistency. If sugar syrup become a little thick than required consistency, rava-besan mixture becomes dry. When I prepared Laddu, mixture became little dry and I could not make Laddu. I added some milk and made laddus. It tasted good, and stayed good for 6 to 7 days. It might be because the weather is kind of cold where I stay. If the weather is hot and humid, put them into airtight container and refrigerate.

रवा बेसन लाडू - Rava Besan Ladu

Rava Besan Ladu in English

१२ ते १५ लाडू, मध्यम आकाराचे
वेळ: ३० ते ४० मिनीटे (पाक मुरायला कमीतकमी २० मिनीटे आणि जास्तीत जास्त २ तासही लागू शकतात)

rava besan ladu, Maharashtrian Rava besan ladu, Ladoo recipe, diwali faralसाहित्य:
१ कप बारीक रवा
१/२ कप बेसन
४ टेस्पून तूप
१ कप साखर
१/२ कप पाणी
१/२ टिस्पून वेलचीपूड
बदाम काजूचे पातळ काप

कृती:
१) बारीक रवा मध्यम आचेवर कोरडाच भाजावा. गुलाबीसर रंग येऊ द्यावा. तसेच भाजताना सतत कालथ्याने उलथत राहावा. मोठ्या आचेवर भाजल्यास रंग पटकन येईल पण रवा कच्चाच राहिल.
२) रवा भाजला कि परातीत काढून ठेवावा. त्याच कढईत तूप घालून, मध्यम आचेवर बेसन खमंग भाजून घ्यावे. बदाम काजूचे काप घालावे.
३) दुसर्‍या पातेल्यात १ कप साखर आणि १/२ कप पाणी घालून एकतारी पाक करावा. एकतारी पाक करण्यासाठी साखर पाणी एकत्र करावा एक उकळी येऊ द्यावी. उकळी आली कि मिश्रण फेसाळेल आणि फेस कमी झाला कि अर्ध्या मिनीटात लगेच गॅस बंद करावा आणि हा पाक रवा आणि बेसनाच्या मिश्रणात घालावा. कालथ्याने ढवळावे आणि झाकून ठेवावे. १५-२० मिनीटांनी मिश्रण ढवळावे. वेलचीपूड घालावी. हळू हळू मिश्रण आळेल आणि लाडू वळण्याइतपत घट्ट झाले कि लगेच लाडू वळावेत.

टीप:
१) पाक व्यवस्थित जमला पाहिजे, पाक गरजेपेक्षा थोडाजरी दाट झाला कि मिश्रण कोरडे होते. मी लाडू बनवले तेव्हा मिश्रण पटकन आळले आणि जरा कोरडे झाले तेव्हा मी थोडे दुध घालून लाडू वळले. छान झाले आणि ८ दिवस टिकलेसुद्धा. जर दमट हवेच्या ठिकाणी राहात असाल आणि लाडू वळताना दुध घातले असेल तर शक्यतो लाडू बनवल्यावर दुसर्‍या दिवशी फ्रिजमध्ये ठेवावेत.

Tuesday, October 13, 2009

Sev recipe

Sev in Marathi

Yield: Approx 2 cups
Time: 30 minutes

Sevpuri, Pani puri, dahi puri, sev batata puri, shev batata puri, shev recipe, plain shev recipe
Ingredients:
1/4 cup waterdiwali faral, Shev Recipe, Shev recipi, sev diwali
1/4 cup Oil
salt to taste
6 to 7 tbsp Gram Flour
1/2 tsp Ajwain powder
oil for deep frying


Method:
1) whisk Oil, water and Ajwain powder together till both gets incorporated together. Add salt and turmeric in this mixture.
2) In this mixture, add gram flour one spoon at a time. Add all the gram flour and make thick batter.
3) From chakali press, replace chakali attachment with sev attachment (small plate with tiny holes). Grease sev press from inside with little oil. Put the batter into sev maker.
4) Heat oil in the fryer. Press sev maker and move your hands in circular motion from center to outside. Make small circles like shown in the picture.
Fry for a minute over medium high heat. Do not over-fry, otherwise color turns to brown.
Place on a paper towel to remove excessive oil. Crush gently with hands to make Shev.

diwali faral, chakali press, sev press

शेव - Sev Recipe

Sev in English

साधारण २ कप शेव
वेळ: ३० मिनीटे

Sevpuri, Pani puri, dahi puri, sev batata puri, shev batata puri, shev recipe, plain shev recipe
साहित्य:
१/४ कप पाणीdiwali faral, Shev Recipe, Shev recipi, sev diwali
१/४ कप तेल
चवीपुरते मिठ
६ ते ७ टेस्पून बेसन
१/४ टिस्पून हळद
१/२ टिस्पून ओव्याची पुड
तेल तळण्यासाठी

कृती:
१) तेल, ओवापुड आणि पाणी एकत्र करून फेसून घ्यावे. निट एकजीव होवू द्यावे. मिश्रण चांगले पांढरे झाले पाहिजे. या मिश्रणात चवीपुरते मिठ आणि हळद घालून मिक्स करावे.
२) यामध्ये चमचा-चमचा बेसन घालून चांगले घोटावे. बर्‍यापैकी घट्टसर मिश्रण करावे. पातळ अजिबात नको, पण एकदम पिठाचा गोळाही मळू नये. मी बनवले होते तेव्हा ६ ते ७ टेस्पून बेसन लागले होते.
३) सोर्‍यामध्ये बारीक शेवेची ताटली बसवावी व आतल्या बाजूने तेलाचा हात लावावा.
४) कढईत तेल गरम करावयास ठेवावे. मिश्रण सोर्‍यामध्ये भरून गरम तेलात आतून बाहेर असे २-३ वेळा गोलाकारात शेव पाडावी. मिडीयम हाय फ्लेमवर शेव तळून घ्यावी. जास्तवेळ तळू नये, यामुळे शेवेचा रंग बदलतो.
तळलेली शेव टिश्यू पेपरवर काढावी. नंतर शेव हलक्या हाताने चुरडून घ्यावी.

diwali faral, chakali press, sev press
Labels:
Sev, Shev, Sev puri, Diwali Faral Recipe

Monday, October 12, 2009

Besan Laddu - Step by step Images

Add Ghee and besan into a pan. The consistency will be thick, but keep stirring.

diwali festival, diwali faralWithin 10 minutes, mixture will become thin in consistency. Keep stirring over medium low heat.

besanache ladoo, besan laduAfter 40 minutes, besan will get cook well. You will sense nice aroma. Color of mixture will change slightly to reddish. Consistency will be more thin.

besan ladu, Maharashtrian Besanache laduAfter 40-45 minutes,turn off the heat. Sprinkle 2 to 3 tbsp milk.

diwali gifts ideas, Indian DiwaliStir 2-3 times. Mixture will become little fussy, you will see lot of bubbles.

Diwali festival, Indian diwali maharashtrian faral recipeWithin few seconds mixture will become thick.

shankarpale, chakali, chirote,diwali faralAfter mixture become lukewarm, add sugar and cardamom powder. You can add nuts along with sugar and cardamom.

Diwali marathi faral, Indian festival diwali, shankarpale, karanji,Mix and make laddus. Happy Diwali

diwali, dipavali, lakshmipoojan, sweets, festival gifts
Back to Besan Ladu Recipe in Marathi / English

Click here for Diwali Festival Faral | दिवाळी फराळाच्या इतर पाककृतींसाठी इथे क्लिक करा

Besan Laddu

Besan Laddu in Marathi

Yield: 10 to 12 medium laddu
Times: approx 1 hour

besan ladu, besan ladoo, Besan laddu, diwali faralIngredients:
1 and 1/2 cup Besan
3/4 cup Pure Ghee (melted)
3/4 cup Powdered Sugar
1/2 tsp Cardamom Powder
3 tbsp Milk
Raisins, cashew-nuts, Almonds chopped

besanache ladu, diwali faral, maharashtrian diwali faral, ladu recipe, besanache laduClick here for another recipe of Besan laddu by making sugar syrup.

Method:
1) Add ghee into a pan. Heat it over medium heat. Add besan and stir. First, it will become little thick. But after 5 to 7 minutes, the consistency will be thin. Roast until you sense nice aroma and color changes to golden. It will take approx 35 to 40 minutes for roasting. But, roast over medium low heat and keep stirring continuously. If you stop stirring, besan will stick to the bottom.
2) Laddu Recipe-
Without adding milk:
After 35 to 40 minutes, when besan is roasted nicely, switch off heat. Let the besan cool off. Do not add sugar when besan is hot. Once besan is cold, add cashewnuts, almonds and other dry fruits. Also add sugar, mix and make laddu.

After roasting besan, if you are not confident whether roasted besan will form laddus or not. you can add little milk to hot roasted besan. Read the next point for the recipe of laddu
By Adding milk
After roasting besan for 35 to 40 minutes, it will get nice golden color. Turn off the heat and immediately sprinkle 2 to 3 tbsp milk all over roasted besan and stir. You will see lot of bubbles and within a few seconds besan will become thick. Transfer it to another bowl. Let it become lukewarm, so that you can handle it properly. After 20-25 minutes, add dry fruits, cardamom powder and sugar. mix nicely and make laddu after it becomes completely cold.

बेसन लाडू (बिनपाकाचे) - Besan Ladu

Besan Ladu in English

१० ते १२ मध्यम आकाराचे लाडू
वेळ: साधारण १ तास (प्रमाण दुप्पट केल्यास ३० ते ४० मिनीटे अधिक)

besan ladu, besan ladoo, Besan laddu, diwali faralबेसन लाडू, साखरेचा पाक करूनही बनवता येतात, त्या रेसिपीसाठी इथे क्लिक करा - पाकातले बेसन लाडू

साहित्य:

दिड कप बेसन
साधारण पाऊण कप तूप (वितळवलेले)
३/४ कप पिठी साखर (किंवा गरजेनुसार)
१/२ टिस्पून वेलचीपूड
३ टेस्पून दूध
बेदाणे किंवा सुकामेव्याचे तुकडे आवडीनुसार

besanache ladu, marathi diwali faral, besan ke laddu, laddu recipeकृती:
१) बेसन तूपामध्ये मध्यम आचेवर खमंग भाजून घ्यावे (साधारण ३५ ते ४० मिनीटे). भाजताना सारखे ढवळत राहावे. तूपात बेसन घातल्यावर आधी घट्ट होईल आणि साधारण ५ ते ७ मिनीटांत पातळ व्हायला लागेल. पातळ झाले तरी काळजी करू नये.
२) दुध न घालता:
बेसन छान बदामी रंगावर भाजले गेले कि गॅस बंद करावा. बेसन पूर्ण गार होवू द्यावे. साधारण २ तास तरी साखर घालू नये. नंतर त्यात आवडीप्रमाणे सुकामेवा, वेलचीपूड आणि गरजेनुसार साखर घालावी. निट मिक्स करून लाडू वळावेत. कधी कधी लाडूचे पिठ पातळ झाल्यासारखे वाटते आणि लाडू बसतात. पण काही तासांनी लाडू वळले कि छान होतात.

तरीही बेसन गरम असतानाच थोडे दुध घातले तर शक्यतो लाडू चुकत नाहीत. त्याची कृती पुढीलप्रमाणे.
२) दुध घालून:
बेसन व्यवस्थित भाजले गेले आणि खमंग वास आला कि गॅस बंद करावा आणि दुधाचा हबका मारावा. यामुळे बेसन चांगले फुलेल (आधी फसफसेल) आणि घट्टसर होईल. हे बेसन लगेच दुसर्‍या भांड्यात काढून ठेवावे. साधारण २० मिनीटांनी यात सुका मेवा, वेलचीपूड आणि साखर घालून हलके मळून ठेवून द्यावे. गार झाले कि लाडू वळावेत.

टिप:
१) हे लाडू १५ ते २० दिवस सहज टिकतात. फक्त बेसन गरम असतानाच दुधाचा हबका मारावा.

Labels:
Besan Ladu, Besanache ladoo

Friday, October 9, 2009

Baked Karanji For Diwali

Baked Dryfruit Karanji in Marathi

Yield: 30 to 35 Small Karanji
Time: 50 Minutes (If Filling is ready)

Bake karanji, bake kelelya karanjya, dry fruit karanji, gujia, gujiya, Diwali maharashtrian karanji, diwali faral

Related Recipes:-
Coconut Karanji **** Diwali Faral Recipes **** Fenugreek Shankarpale **** Peas and Potato filled Karanji

Ingredients:
2 cups All purpose flour
3 tbsp Ghee, melted
pinch of salt
Dry fruit Karanji Filling

Milk, enough to knead the dough

Step by step Image presentation

Method:
1) Mix 2 cups of all purpose flour, salt and 3 tbsp Ghee. Rub the ghee evenly. Add milk and make medium consistency dough. Cover and rest it for 15 minutes.
2) Divide the dough into 25 to 30 small balls (each ball approx 1 inch diameter).
3) Roll 1 ball into round shape. Put 1 tbsp filling in the center. Apply some water on the edge of half circle area. Cover the filling by folding other half area. Join the edges and seal. Again seal and make design by Fork. Leave 1/2 cm of design area and cut the remaining dough by cutter. Add the cut dough stripe into the dough.
4) Prepare all the karanjis, Apply some ghee all over the karanji. Place over baking pan lined with aluminum foil.
5) Preheat oven over 275 F. Bake for 40 to 45 minutes.
Do not make them too much brown. It will burn the filling.

Tips:
1) It is not completely diet recipe as we have added some ghee while kneading the dough. Without ghee Karanji will become very dry and might get burned while baking.

बेक्ड करंजी - Baked Karanji

Dryfruit Karanji (baked) in English

३० ते ३५ लहान करंज्या
वेळ: ५० मिनीटे (सारण तयार असल्यास)

Bake karanji, bake kelelya karanjya, dry fruit karanji, gujia, gujiya, Diwali maharashtrian karanji, diwali faralसंबंधित पाककृती:-
ओल्या नारळाच्या करंज्या **** दिवाळी फराळ **** मेथी शंकरपाळे **** मटार बटाटा करंजी

साहित्य:
२ कप मैदा
३ टेस्पून तूप, पातळ
चिमूटभर मिठ
ड्रायफ्रुटचे सारण
दुध, पिठ भिजवण्यापुरते

स्टेप बाय स्टेप फोटोनुसार प्रेझेंटेशनसाठी इथे क्लिक करा.

कृती:
१) मैदयात तूप आणि मिठ घालून तूप सर्व मैद्याला चोळून घ्यावे. दुध घालून मध्यमसर कणिक मळून घ्यावी. १५ मिनीटे झाकून ठेवावी.
२) कणिक २५ ते ३० समान छोटे गोळे करून घ्यावे. गोळा साधारण १ इंचाचा तरी असावा.
३) गोळा लाटून गोल पुरी करावी. मध्यभागी १ टेस्पून ड्रायफ्रुटचे सारण घालावे. अर्ध्या गोलाच्या कडेवर थोडे पाणी लावावे. दुसरी बाजू दुमडून पाणी लावलेल्या कडेवर आणावी. कडा चिकटवून घ्याव्यात. काटा-चमच्यातील काट्याने कडेवर डिझाईन बनवावे आणि कातणाने १/२ सेमी जागा सोडून कड कापावी. कापलेली पट्टी पुन्हा कणकेत मिक्स करावी किंवा ३ ते ४ करंज्या केल्यावर त्यांच्या पट्ट्या एकत्र करून नवी करंजी बनवावी.
४) सर्व करंज्या बनवून घ्याव्यात. सर्व बाजूनी तूपाचा हलकासा हात फिरवावा. बेकिंग ट्रेमध्ये अल्युमिनम फॉईल पसरवून त्यावर करंज्या अरेंज कराव्यात.
५) ओव्हन २७५ F वर प्रिहीट करावे. ओव्हन प्रिहीट झाल्या कि ४० ते ४५ मिनीटे बेक करावे.
खुप जास्तवेळ बेक करू नये. यामुळे छान ब्राऊन रंग येईल, पण आत भरलेले सारण जळेल.

टीप:
१) या जरी बेक केलेल्या करंज्या असल्या तरी पूर्ण डाएट करंज्या नाहीत, कारण पिठात आपण थोडे तूप घातले आहे. जर तूप घातले नाही तर करंज्या खुपच ड्राय होतात. आणि पटकन जळतात. म्हणून यामध्ये जे तळतानाचे तेल करंजीत शोषले जाते ते अवॉइड होते.

Labels:
Baked Karanji, Baked Gujiya, Diwali Recipes, Diwali Faral

Thursday, October 8, 2009

Karanji Images

Dryfruit Filling for Karanji

Roll the dough ball into a small Puri. Put approx 1 tbsp filling in the center.

Apply Milk / water with finger on the edges (half area)

Close the edges and seal nicely.

Make Impressions with fork to decorate.

Cut excessive dough with cutter.

Make all Karanjis and coat with little ghee

Preheat oven at 275 F. Bake for approx 45 minutes. Baked Karanjis are ready.
Return to Baked Karanji Recipe in English / Marathi

Wednesday, October 7, 2009

Dry Fruit Karanji Stuffing

Dry Fruit Karanji Stuffing in Marathi

Yield: approx 2 cups
Time: 50 minutes

bake karanji, dry fruit karanji, khobaryachya karanjya, diwali faral, Ingredients:
3/4 cup Fine Semolina
1/2 cup Khoya, nicely roasted
1/2 tsp Cardamom Powder
5 tbsp Sugar
3 tsp Ghee
1/2 to 3/4 cup Dry fruits. I used ::::
2 tbsp Chirounji
7-8 Cashew Nuts, chopped
7-8 Almonds, thin slices
Dates 6 to 7, deseeded and finely chopped (I used pitted dates)
Dried Date 5 to 6, deseeded and finely chopped
1/4 cup dried coconut, roasted
2 tsp Poppy Seeds, roasted

Method:
1) Heat 2 tsp ghee into a pan, add chirounji, cashew-nuts, Almonds, dried dates. Roast over medium heat for about 5 to 8 minutes. Do not add dates along with the other dry fruits. Add it 2 minutes before removing from the heat.
2) Heat 1 tsp Ghee in a pan. Add Semolina and roast over medium-low heat until it gets nice pink color. Do not roast over high or medium high heat. If you roast semolina over high heat, it will turn brown soon, but it won't be roasted properly. Under-roasted semolina will give raw taste of semolina. Once semolina is done, transfer to a plate.
3) Mix roasted coconut, poppy seeds, roasted dried fruits, roasted khoya, roasted semolina and cardamom powder. Rub gently and mix all nicely. Especially mix khoya nicely. Add sugar to taste. (Note)

Note:
1) Instead of sugar you can increase quantity of dates to give sweetness.
2) Add any kind of dry fruits which are available like unsalted pistachios, Walnuts, raisins etc.

ड्रायफ्रुट करंजीचे सारण

Dry Fruit Karanji Stuffing in English

वेळ: साधारण ५० मिनीटे
यिल्ड: साधारण २ कप
bake karanji, dry fruit karanji, khobaryachya karanjya, diwali faral, साहित्य:
३/४ कप बारीक रवा
१/२ कप खवा, भाजलेला (रिकोटा चिजपासून खवा)
१/२ टिस्पून वेलची पूड
५ टेस्पून पिठीसाखर किंवा चवीनुसार
३ टिस्पून तूप
अर्धा ते पाऊण कप ड्राय फ्रुट्स, मी पुढीलप्रमाणे वापरली:
२ टेस्पून चारोळी
७ ते ८ काजू, बारीक तुकडे
७ ते ८ बदाम, पातळ चकत्या
६ ते ७ खजूर, बिया काढून बारीक चिरून घ्यावे
५ ते ६ खारका, बिया काढून बारीक चिरून घ्यावे.
१/४ कप किसलेले सुकं खोबरं, भाजून
२ टिस्पून खसखस, हलकीशी भाजून

कृती:
१) पॅनमध्ये २ टिस्पून तूप गरम करून त्यात चारोळी, काजूचे तुकडे, बदाम स्लाईसेस, चिरलेली खारीक घालून ५ ते ८ मिनीटे मध्यम आचेवर परतावेत. खजूर आधीच घालू नये. गॅसवरून पॅन बाजूला करायच्या आधी २ मिनीटे खजूर घालून परतावे. नंतर एका परातीत काढून ठेवावे.
२) त्याच पॅनमध्ये १ टिस्पून तूप गरम करून त्यात रवा गुलाबीसर रंगावर भाजावा. भाजताना आच मंद किंवा मध्यम असावी. बारीक रवा खुप मोठ्या आचेवर भाजल्यास करपू शकतो. तसेच पटकन ब्राऊन झाला तरी तो निट भाजला गेलेला नसतो. कचवट राहातो.
३) आता भाजलेला रवा, भाजलेला खवा, भाजलेली ड्राय फ्रुट्स, भाजलेली खसखस आणि वेलचीपूड घालून निट मिक्स करावे. खासकरून खवा निट मिक्स करावा कारण त्याच्या गुठळ्या होण्याची शक्यता असते. शेवटी चवीनुसार साखर घालून मिक्स करावे. (टीप १)

टीप:
१) साखर नको असेल तर गोडपणासाठी साखरेऐवजी खजूराचे प्रमाण वाढवावे.
२) घरातील उपलब्धतेनुसार तसेच आवडीनुसार कोणताही सुकामेवा वापरू शकतो जसे पिस्ता, अक्रोड, बेदाणे ईत्यादी.
३) या सारणापासून ड्रायफ्रुट करंजी किंवा ड्रायफ्रुट मोदक बनवू शकतो.

Tuesday, October 6, 2009

September 2009 Recipes

September 2009 Recipes

सूप - Soup
मक्याचे सार - Corn Soup

अपेटाईजर - Appetizer
पनीर ६५ - Paneer 65

चटणी - Chutney
मिरचीचा खरडा - Green Chili Kharda

भाजी - Curry
फरसबीची भाजी - French Beans Sabzi

फ्लॉवर बटाटा रस्सा - Cauliflower Potato Curry

आमटी - Dal
कटाची आमटी - Katachi Amti

पराठा - Paratha
पुदीना पराठा - Mint Paratha

गोड - Sweets
मूगडाळ हलवा - Moong Dal Halwa

स्नॅक्स - Snack
मेथी शंकरपाळे - Fenugreek Shankarpale

September 2008 Recipes:

हिरवी चटणी, चिंचगूळाची चटणी - Green chutney and Tamarind Chutney

पिटा ब्रेड - Pita Bread

हुम्मुस - Hummus

मेथीच्या देठाची भजी - Fenugreek stem Pakoda

पनीर कोफ्ता करी
- Paneer Kofta Curry

चकली - Chakali

September 2007 Recipes:

कोथिंबीर वडी - Kothimbir Vadi (Cilantro savory cakes)

मसालेभात - Masalebhat (Spiced Rice)

चणाडाळ लाडू - Chana Dal Ladu

पालक पुरी - Palak puri (Spinach Puri)

साबुदाणा थालिपीठ - Sabudana Thalipith

पंचामृत - Panchamrut

मूग भजी - mung Pakoda

Friday, October 2, 2009

Paneer Wraps

Paneer Wraps in Marathi

Time: 45 minutes
Serves:6 to 7 Rolls

Paneer Wraps, Paneer Roll, Paneer Snacks, Paneer fankieIngredients:
1 n 1/2 cup Paneer, small cubes
1 big Tomato, finely chopped
1/4 cup Onion, thinly sliced
1/4 cup Bell pepper, finely chopped
1 tbsp Oil
Marination:
1/4 cup Yogurt
1 tsp Red chili Powder
1/4 tsp Turmeric Powder
1/2 tsp Ginger-garlic paste
1 tbsp Rice flour
2 pinch Kasoori Methi
1/2 tsp Garam Masala
1/2 tsp Chat Masala
Salt to taste
Wraps:
1 cup Wheat Flour
1/4 cup Milk
Salt to taste
1 tbsp Butter, melted
Mint Chutney (Optional)

Method:
1) Mix all the ingredients given under Marination in a bowl. Whisk nicely. Add Paneer pieces, mix gently and coat them with marination. Transfer it to another bowl and add Tomatoes to the leftover marination. Let the paneer rest for 20 minutes.
2) In a mixing bowl, add wheat flour and salt, add milk and make a firm dough. Cover and rest for 20 minutes.
3) Heat 1 tbsp oil in a pan. Add Onion, saute for 30 seconds. Add bell peppers, saute for 30 seconds and add marinated paneer and tomatoes. Saute for 1 minute. If you cook for longer, paneer will melt and become gooey. Adjust salt and red chili powder if needed. Remove from heat.
4) Divide the dough into 9 to 10 equal balls. Roll into round shape. roast on hot tawa. brush little butter. After roasting transfer roties into a covered container to keep them moist.
5) When you want to serve Paneer wraps, make the paneer mixture little warm in microwave. If you wish to make wraps little spicy, spread little Green chutney, Place the wrap over hot tawa, place 1 and 1/2 tbsp mixture in the center and wrap by covering paneer mixture. Carefully roast both sides.
Serve hot for teatime snack with tomato ketchup and Green chutney.

पनीर फ्रॅन्की - Paneer Frankie

Paneer Frankie in English

Paneer is a very versatile ingredient. It can be used in sweet as well as savoury dishes. Though paneer is more popular in main dishes like Paneer Masala, Palak Paneer, Paneer Kofta etc. , it can be used to make healthy and delicious snack like the recipe posted below. This is a filling, kid friendly and nutritious snack. For preparing this dish, fresh made Paneer from milk is highly recommended. The wraps will be very tasty if the Paneer is fresh. Sometimes, the ready made paneer contains all purpose flour to make it firm and more suitable for Tikka and Sabjis. Wraps, Soups and Salads taste well with soft fresh paneer.

६ ते ७ पनीर फ्रॅन्की
वेळ: ४५ मिनीटे

Paneer Wraps, Paneer Roll, Paneer Snacks, Paneer fankieसाहित्य:
दिड कप पनीर, छोटे तुकडे
१ मोठा टोमॅटो, बारीक चिरून
१/४ कप कांदा, पातळ उभे काप
१/४ कप भोपळी मिरची, बारीक चिरून
१ टेस्पून तेल
मॅरीनेशन
१/४ कप दही
१ टिस्पून लाल तिखट
१/४ टिस्पून हळद
१/२ टिस्पून आले-लसूण पेस्ट
१ टेस्पून तांदूळ पिठ
२ चिमूटभर कसूरी मेथी
१/२ टिस्पून गरम मसाला
१/२ टिस्पून चाट मसाला
चवीपुरते मिठ
रॅप्स
१ कप कणिक
१/४ कप दुध
चवीपुरते मिठ
१ टेस्पून बटर, वितळलेले
मिंट चटणी (ऐच्छिक)

कृती:
१) मॅरीनेशनखाली दिलेले सर्व साहित्य एका वाडग्यात मिक्स करावे. पनीरचे तुकडे घालून चमच्याने मिक्स करावे. पनीरच्या तुकड्यांना मॅरीनेशन निट लागले पाहिजे. मॅरीनेट केलेले पनीर दुसर्‍या वाडग्यात काढून उरलेल्या मॅरीनेशनमध्ये टोमॅटो घालून मिक्स करावे. पनीर २० मिनीटे झाकून ठेवावे.
२) कणिक, मिठ आणि दुध एकत्र करून कणिक मळून घ्यावी. झाकून २० मिनीटे बाजूला ठेवावे.
३) एका पॅनमध्ये १ टेस्पून तेल गरम करून त्यात कांदा ३० सेकंद परतावा. भोपळी मिरची घालून ३० सेकंद परतावे आणि मॅरीनेट केलेले पनीर आणि टोमॅटो घालून परतावे. मिनीटभरच परतावे. खुप वेळ परतू नये नाहीतर पनीर वितळते. चव पाहून वाटल्यास मिठ. तिखट घालावे. तयार स्टफींग एका वाडग्यात काढून ठेवावे.
४) कणिक ८ ते १० समान गोळ्यांमध्ये विभागून घ्यावी. पोळी लाटून तव्यावर नेहमीप्रमाणे भाजून घ्यावी. फक्त भाजताना थोडे बटर लावावे. पोळ्या मऊ राहण्यासाठी डब्यात भरून ठेवाव्यात.
५) जेव्हा पनीर फ्रॅन्की सर्व्ह करायचे असतील तेव्हा पनीरचे मिश्रण मायक्रोवेवमध्ये थोडे गरम करून घ्यावे. जर रॅप्स थोडे स्पाईसी बनवायचे असतील तर पोळीला थोडी मिंट चटणी लावावी. गरम तव्यावर हि पोळी ठेवावी. मध्यभागी दिड टेस्पून पनीरचे मिश्रण ठेवावे. आणि दोन्ही बाजू पनीरच्या मिश्रणावर ठेवून सुरळी करावी. सावकाशपणे गरम करावे आणि गरमा गरम सर्व्ह करावे. हे रॅप्स नुसतेही छान लागतात पण वाटल्यास टोमॅटो केचप आणि हिरव्या चटणीबरोबर सर्व्ह करावे.

Labels:
Paneer Frankie, Paneer wraps, Spicy Paneer Rolls