Monday, November 30, 2009


Thursday, November 26, 2009
पनीर टीक्का मसाला - Paneer Tikka Masala
Paneer Tikka Masala in English
वाढणी: १ प्लेट (साधारण २ ते ३ जणांपुरती)
वेळ: ४० मिनीटे
 साहित्य:
कांदा पेस्ट
२ मध्यम कांदे
२ टिस्पून तेल
काजूपेस्ट
१/२ कप काजू
१/४ कप मगज बी
टोमॅटो प्युरी
३ लालबुंद टोमॅटो
इतर जिन्नस
१ टिस्पून धणेपूड
१ टिस्पून जिरेपूड
२ चिमूटभर कसूरी मेथी
१ टिस्पून लाल तिखट
चवीपुरते मिठ
१ टेस्पून बटर
१ टेस्पून आलेलसूण पेस्ट
पनीर टिक्काच्या रेसिपीसाठी इथे क्लिक करा
कृती:
प्रथम सर्व पेस्ट तयार करून घ्याव्यात.
कांदा पेस्ट
कच्च्या कांद्याची पेस्ट - १ कांदा मोठे तुकडे करून मिक्सरवर पेस्ट करून घ्यावी.
परतलेल्या कांद्याची पेस्ट - १ कांदा पातळ उभे काप करून तेलामध्ये मोठ्या आचेवर परतून घ्यावे. कांदा निट परतला कि किंचीत पाणी घालून मिक्सरमध्ये बारीक पेस्ट करून घ्यावी.
काजू पेस्ट
काजू, मगज बी, आणि १/४ कप पाणी घालून मिक्सरमध्ये बारीक पेस्ट करावी.
टोमॅटो प्युरी
३ टोमॅटो गरम पाण्यात २ ते ३ मिनीटे उकळून घ्यावे. लगेच गार पाण्यात घालावे म्हणजे साले सुटायला मदत होईल. साले काढून मिक्सरमध्ये प्युरी करावी.
मुख्य कृती
१) पॅनमध्ये बटर गरम करून त्यात आलेलसणाची पेस्ट परतावी. लगेच कच्च्या कांद्याची पेस्ट घालून मोठ्या आचेवर कांदा ब्राऊन होईस्तोवर परतावे.
२) टोमॅटोची प्युरी घालून मध्यम आचेवर टोमॅटोचा कच्चा वास जाईस्तोवर परतावे. नंतर परतलेल्या कांद्याची पेस्ट आणि काजूची पेस्ट घालून मिक्स करावे.
३) यात धणे-जिरेपूड, कसूरीमेथी, लाल तिखट आणि चवीपुरते मिठ घालून दाटसर ग्रेव्ही बनवावी.
गरमागरम ग्रेव्ही, पनीर व्हेजिटेबल टिक्क्यावर घालून सर्व्ह करावी.
टीप:
१) लालसर रंग येण्यासाठी अगदी किंचीत लाल रंग १ चमचा पाण्यात मिसळून ग्रेव्ही उकळताना घालावा.
२) काजूपेस्ट घालताना एकदम सगळी घालू नये. आधी २ ते ३ टेस्पून घालून ढवळावे. काजूची पेस्ट जास्त झाल्यास ग्रेव्हीची चव बदलते. चव पाहूनच अजून काजूपेस्ट घालावी.
Labels:
Paneer Tikka Masala, Vegetable Paneer Tikka, Punjabi Paneer Tikka
वाढणी: १ प्लेट (साधारण २ ते ३ जणांपुरती)
वेळ: ४० मिनीटे
साहित्य:कांदा पेस्ट
२ मध्यम कांदे
२ टिस्पून तेल
काजूपेस्ट
१/२ कप काजू
१/४ कप मगज बी
टोमॅटो प्युरी
३ लालबुंद टोमॅटो
इतर जिन्नस
१ टिस्पून धणेपूड
१ टिस्पून जिरेपूड
२ चिमूटभर कसूरी मेथी
१ टिस्पून लाल तिखट
चवीपुरते मिठ
१ टेस्पून बटर
१ टेस्पून आलेलसूण पेस्ट
पनीर टिक्काच्या रेसिपीसाठी इथे क्लिक करा
कृती:
प्रथम सर्व पेस्ट तयार करून घ्याव्यात.
कांदा पेस्ट
कच्च्या कांद्याची पेस्ट - १ कांदा मोठे तुकडे करून मिक्सरवर पेस्ट करून घ्यावी.
परतलेल्या कांद्याची पेस्ट - १ कांदा पातळ उभे काप करून तेलामध्ये मोठ्या आचेवर परतून घ्यावे. कांदा निट परतला कि किंचीत पाणी घालून मिक्सरमध्ये बारीक पेस्ट करून घ्यावी.
काजू पेस्ट
काजू, मगज बी, आणि १/४ कप पाणी घालून मिक्सरमध्ये बारीक पेस्ट करावी.
टोमॅटो प्युरी
३ टोमॅटो गरम पाण्यात २ ते ३ मिनीटे उकळून घ्यावे. लगेच गार पाण्यात घालावे म्हणजे साले सुटायला मदत होईल. साले काढून मिक्सरमध्ये प्युरी करावी.
मुख्य कृती
१) पॅनमध्ये बटर गरम करून त्यात आलेलसणाची पेस्ट परतावी. लगेच कच्च्या कांद्याची पेस्ट घालून मोठ्या आचेवर कांदा ब्राऊन होईस्तोवर परतावे.
२) टोमॅटोची प्युरी घालून मध्यम आचेवर टोमॅटोचा कच्चा वास जाईस्तोवर परतावे. नंतर परतलेल्या कांद्याची पेस्ट आणि काजूची पेस्ट घालून मिक्स करावे.
३) यात धणे-जिरेपूड, कसूरीमेथी, लाल तिखट आणि चवीपुरते मिठ घालून दाटसर ग्रेव्ही बनवावी.
गरमागरम ग्रेव्ही, पनीर व्हेजिटेबल टिक्क्यावर घालून सर्व्ह करावी.
टीप:
१) लालसर रंग येण्यासाठी अगदी किंचीत लाल रंग १ चमचा पाण्यात मिसळून ग्रेव्ही उकळताना घालावा.
२) काजूपेस्ट घालताना एकदम सगळी घालू नये. आधी २ ते ३ टेस्पून घालून ढवळावे. काजूची पेस्ट जास्त झाल्यास ग्रेव्हीची चव बदलते. चव पाहूनच अजून काजूपेस्ट घालावी.
Labels:
Paneer Tikka Masala, Vegetable Paneer Tikka, Punjabi Paneer Tikka
Paneer Tikka Masala
Paneer Tikka Masala in Marathi
Serves: 2 to 3 persons
yield: 1 medium plate
Time: 40 minutes
Ingredients:
Onion Paste
2 medium Onion
2 tsp Oil
Cashew paste
1/2 cup Cashew nuts
1/4 cup Magaj Seeds (Watermelon seeds)
Tomato Puree
3 red and juicy Tomatoes
Other Ingredients
1 tsp Coriander powder
1 tsp Cumin Powder
2 pinches Kasoori Methi
1 tsp Red chili powder
Salt to taste
1 tbsp Butter
1 tbsp Ginger-garlic paste
Click here for the Recipe of Paneer Tikka
Method:
First, prepare all the pastes.
Onion Paste
Cut one onion into cubes and grind to a fine paste.
Thinly slice (Lengthwise) the remaining onion. Heat oil in a pan and roast the sliced onion over medium high heat until nice brown in color. Grind it in a grinder by adding 1/4 cup of water.
Cashew paste
Add cashew nuts, Magaj seeds and 1/4 cup water in a grinder. Grind them together until you get nice smooth paste.
Tomato Puree
Blanch tomatoes and remove the skin. Then put the tomatoes into grinder and puree.
Recipe of gravy
1) Heat 1 tbsp butter into a pan. Add ginger garlic paste and saute. Then add paste of raw onion and saute over high heat until color changes to brown.
2) Add tomato puree and cook over medium heat until raw smell of tomato disappears. Then add paste of sauteed onions and 2-3 tbsp of cashew paste. Mix nicely and cook for 3 to 4 minutes.
3) Then add coriander powder, cumin powder, kasoori methi, red chili powder and salt to taste. Make a thick gravy.
Once gravy is ready. Pour it over Paneer and vegetable Tikka. Serve hot with any Indian bread.
Tips:
1) If you want to give restaurant style red color to gravy, add a small pinch of edible red color to gravy while cooking.
2) Do not add entire cashew paste in the gravy. First, add 2 to 3 tbsp, cook for a while, taste the gravy and then only add the cashew paste if needed. Cashew has a sweet taste which may affect the flavor of gravy.
Tuesday, November 24, 2009
Punjabi Paneer Tikka
Paneer Tikka in Marathi
Serves: 3 to 4 persons
Time: approx 30 minutes
 Ingredients:
3 to 4 Skewers (Wooden or metallic)
3 to 4 small bell peppers with different colors(Red, Green, Yellow, Orange)
3 to 4 Shallots
8 to 10 cherry tomatoes
200 gram Paneer
Oil Brushing for vegetables
2 tbsp Oil
1/2 tsp Coriander powder
1/2 tsp Cumin powder
1/2 tsp red chili powder
Pinch of Kasoori Methi
Pinch of Salt
Paneer Marination
5 tbsp Thick yogurt
1 tbsp Corn starch
1/4 tsp Turmeric powder
1 tsp red chili powder
1 tsp ginger-garlic paste
1 tsp Coriander-Cumin powder
2 pinches Kasoori Methi
Salt to taste
 Method:
1) If you are using Wooden skewers, soak then in cold water for 1/2 an hour. It will prevent them from burning while baking.
2) Mix all the ingredients for Paneer marination. Cut paneer into 1 n 1/2 inch pieces. Marinate paneer for 15 minutes.
3) Cut Bell peppers into 1 inch pieces. If the shallots are little big in size, cut them into half. Peel them.
4) Once you are done with cutting. Start threading vegetables and Paneer in the skewers. First thread cherry tomato, then 2 to 4 bell pepper pieces and a small shallot. Then thread Paneer. After paneer, thread bell peppers and shallot.
5) Prepare the oil mixture by combining 2 tbsp Oil, 1/2 tsp Coriander powder, 1/2 tsp Cumin powder, 1/2 tsp red chili powder, Pinch of Kasoori Methi, Pinch of Salt.
6) Put the oven on broil for 3 minutes. While oven is preheating, brush the vegetables with Oil mixture.
7) Now skewers are ready to bake. Keep the skewers on oven-safe plate (I used cast Iron skillet). Put the skillet on middle or upper rack. Broil for 2 to 3 minutes and check in between. Once the edges of paneer becomes brown, remove the skewers from oven. Do not over-bake, otherwise Paneer will melt.
7) Remove the baked vegetables and paneer in serving plate and pour a ladleful tikka Masala. Serve hot with any Indian bread.
Tips:
1) To bake the paneer, it should be little firm. Hence, add some all purpose flour, while making Paneer at home. After curdling milk, drain the water by saving crumbled Paneer in cheese cloth. Squeeze out all the water, transfer the paneer crumbs to a plate. Add 2 to 3 tbsp all purpose flour and knead a little. Do not make it too soft. Again put the kneaded paneer to cheese cloth and tie tightly. Put any heavy thing over it to remove excessive water and to get a nice block of paneer.
2) Do not marinate paneer for longer. It becomes mushy and melts while baking.
3) If you don't have oven or Tandoor at home, deep fry or shallow fry marinated paneer. Stir fry oil brushed vegetables over high heat. However, Tikka baked in over or in tandoor gives best taste.
4) Cut bigger pieces of Paneer, as small pieces tend to break while threading on the skewers.
Serves: 3 to 4 persons
Time: approx 30 minutes
Ingredients:3 to 4 Skewers (Wooden or metallic)
3 to 4 small bell peppers with different colors(Red, Green, Yellow, Orange)
3 to 4 Shallots
8 to 10 cherry tomatoes
200 gram Paneer
Oil Brushing for vegetables
2 tbsp Oil
1/2 tsp Coriander powder
1/2 tsp Cumin powder
1/2 tsp red chili powder
Pinch of Kasoori Methi
Pinch of Salt
Paneer Marination
5 tbsp Thick yogurt
1 tbsp Corn starch
1/4 tsp Turmeric powder
1 tsp red chili powder
1 tsp ginger-garlic paste
1 tsp Coriander-Cumin powder
2 pinches Kasoori Methi
Salt to taste
Method:1) If you are using Wooden skewers, soak then in cold water for 1/2 an hour. It will prevent them from burning while baking.
2) Mix all the ingredients for Paneer marination. Cut paneer into 1 n 1/2 inch pieces. Marinate paneer for 15 minutes.
3) Cut Bell peppers into 1 inch pieces. If the shallots are little big in size, cut them into half. Peel them.
4) Once you are done with cutting. Start threading vegetables and Paneer in the skewers. First thread cherry tomato, then 2 to 4 bell pepper pieces and a small shallot. Then thread Paneer. After paneer, thread bell peppers and shallot.
5) Prepare the oil mixture by combining 2 tbsp Oil, 1/2 tsp Coriander powder, 1/2 tsp Cumin powder, 1/2 tsp red chili powder, Pinch of Kasoori Methi, Pinch of Salt.
6) Put the oven on broil for 3 minutes. While oven is preheating, brush the vegetables with Oil mixture.
7) Now skewers are ready to bake. Keep the skewers on oven-safe plate (I used cast Iron skillet). Put the skillet on middle or upper rack. Broil for 2 to 3 minutes and check in between. Once the edges of paneer becomes brown, remove the skewers from oven. Do not over-bake, otherwise Paneer will melt.
7) Remove the baked vegetables and paneer in serving plate and pour a ladleful tikka Masala. Serve hot with any Indian bread.
Tips:
1) To bake the paneer, it should be little firm. Hence, add some all purpose flour, while making Paneer at home. After curdling milk, drain the water by saving crumbled Paneer in cheese cloth. Squeeze out all the water, transfer the paneer crumbs to a plate. Add 2 to 3 tbsp all purpose flour and knead a little. Do not make it too soft. Again put the kneaded paneer to cheese cloth and tie tightly. Put any heavy thing over it to remove excessive water and to get a nice block of paneer.
2) Do not marinate paneer for longer. It becomes mushy and melts while baking.
3) If you don't have oven or Tandoor at home, deep fry or shallow fry marinated paneer. Stir fry oil brushed vegetables over high heat. However, Tikka baked in over or in tandoor gives best taste.
4) Cut bigger pieces of Paneer, as small pieces tend to break while threading on the skewers.
पनीर टिक्का - Paneer Tikka
Paneer Tikka in English
Few more Paneer Recipes - Paneer Frankie | Paneer Paratha | Paneer Kadhai | Paneer Pizza | Palak Paneer | Paneer Kofta Curry
३ ते ४ जणांसाठी
वेळ: साधारण ३० मिनीटे
साहित्य:
३ ते ४ स्क्यूअर्स (लाकडी किंवा लोखंडी)
३ ते ४ लहान रंगीत भोपळी मिरच्या (लाल, हिरवा, पिवळा, केशरी)
३ ते ४ छोटे कांदे
८ ते १० छोटे लाल टोमॅटो (चेरी टोमॅटो)
२०० ग्राम पनीर
तेलाचे ब्रशिंग
२ टेस्पून तेल
१/२ टिस्पून धणेपूड
१/२ टिस्पून जिरेपूड
१/२ टिस्पून लाल तिखट
चिमूटभर मिठ
चिमूटभर कसूरी मेथी
पनीर मॅरीनेशनसाठी
५ टेस्पून घट्ट दही
१ टेस्पून कॉर्नस्टार्च
१/४ टिस्पून हळद
१ टिस्पून लाल तिखट
१ टिस्पून आलेलसूण पेस्ट
१ टिस्पून धणेजिरेपूड
२ चिमूटभर कसूरी मेथी
चवीपुरते मिठ
कृती:
१) जर लाकडी स्क्यूअर्स वापरणार असाल तर १/२ तास गार पाण्यात भिजवून ठेवा म्हणजे ओव्हनमध्ये बेक करताना जळणार नाहीत.
२) मॅरीनेशनसाठीचे सर्व साहित्य एकत्र करून त्यात पनीरचे दिड इंचाचे तुकडे करून १५ मिनीटे मॅरीनेट करून ठेवावे.
३) भोपळी मिरच्यांचे १ इंचाचे चौकोनी तुकडे करावे. कांदे जर किंचीत मोठे असतील तर त्यांची साले काढून अर्धे करून घ्यावेत.
४) भाज्या चिरून झाल्या कि स्क्युअरमध्ये प्रथम एक टोमॅटो ओवून घ्यावा. नंतर २-४ तुकडे भाज्या आणि १ तुकडा पनीर असे ओवून सर्वात शेवटी परत टोमॅटो ओवावा. असे सर्व स्क्युअर्स तयार करून घ्यावे. (वरील प्रमाणाला ३ ते ४ स्क्युअर्स लागतील.)
५) ओव्हन ब्रोईलवर २ ते ३ मिनीटे प्रिहीट करावे. तोवर भाज्यांना तेल+मसाला मिश्रणाचे ब्रशिंग करावे. २ टेस्पून तेल, १/२ टिस्पून धणेपूड, १/२ टिस्पून जिरेपूड, १/२ टिस्पून लाल तिखट, चिमूटभर मिठ, चिमूटभर कसूरी मेथी असे साहित्य एकत्र करून भाज्यांना अलगद हाताने किंवा पेस्ट्री ब्रशने लावावे.
६) तयार स्क्युअर्स ओव्हनसेफ प्लेटला तेल लावून त्यावर ठेवावे (मी बिडाचा तवा वापरला होता) आणि साधारण २ ते ४ मिनीटे बेक करावे. खुपवेळ ब्रोईल करू नये त्यामुळे पनीर वितळते. पनीर आणि भाज्या थोड्या ब्राऊन झाल्या कि ओव्हन बंद करून लगेच बाहेर काढाव्यात.
६) स्क्युअर्स वरील भाज्या आणि पनीर हलक्या हाताने प्लेटमध्ये काढाव्यात आणि त्यावर गरमागरम टीक्का मसाला घालून सर्व्ह करावे.
टीप:
१) पनीर बेक करण्यासाठी त्याला थोडा घट्टपणा आणावा लागतो. म्हणून पनीर घरी बनवताना त्यात थोडा मैदा घालावा. पनीर बनवले कि आधी पनीर गाळून घेतल्यावर फडक्यातच पिळावे म्हणजे अधिकचे पाणी निघून जाईल. पनीर एका ताटलीत काढावे. या पनीरच्या चुर्यात २ ते ३ चमचे मैदा घालून थोडे मळावे. खुप मळू नये, आपल्याला फक्त मैदा सर्व पनीरला लावायचा आहे. मळल्यावर परत फडक्यात गच्च बांधून, वरती जड वस्तू ठेवून पनीरची वडी बनण्यासाठी सेट करावे.
२) पनीरचे तुकडे खुपवेळ मॅरीनेट करू नयेत. मऊ पडतात आणि बेक केल्यावर वितळतात.
३) जर ओव्हन नसेल तर मॅरीनेट पनीर तळून घ्यावे किंवा शालो फ्राय करावे आणि भाज्यांना तेल लावून कढईत मोठ्या आचेवर २ मिनीटे परतावे. पण बेक करून किंवा तंदूरमध्ये भाजून चव खुप छान येते.
४) पनीरचे तुकडे जरा मोठेच ठेवावे कारण लहान तुकडे स्क्युअरमध्ये ओवताना तुटतात.
Labels:
Paneer Tikka Masala, Punjabi Paneer Tikka recipe, Tikka Paneer recipe
Few more Paneer Recipes - Paneer Frankie | Paneer Paratha | Paneer Kadhai | Paneer Pizza | Palak Paneer | Paneer Kofta Curry
३ ते ४ जणांसाठी
वेळ: साधारण ३० मिनीटे
साहित्य:३ ते ४ स्क्यूअर्स (लाकडी किंवा लोखंडी)
३ ते ४ लहान रंगीत भोपळी मिरच्या (लाल, हिरवा, पिवळा, केशरी)
३ ते ४ छोटे कांदे
८ ते १० छोटे लाल टोमॅटो (चेरी टोमॅटो)
२०० ग्राम पनीर
तेलाचे ब्रशिंग
२ टेस्पून तेल
१/२ टिस्पून धणेपूड
१/२ टिस्पून जिरेपूड
१/२ टिस्पून लाल तिखट
चिमूटभर मिठ
चिमूटभर कसूरी मेथी
पनीर मॅरीनेशनसाठी
५ टेस्पून घट्ट दही
१ टेस्पून कॉर्नस्टार्च
१/४ टिस्पून हळद
१ टिस्पून लाल तिखट
१ टिस्पून आलेलसूण पेस्ट
१ टिस्पून धणेजिरेपूड
२ चिमूटभर कसूरी मेथी
चवीपुरते मिठ
कृती:१) जर लाकडी स्क्यूअर्स वापरणार असाल तर १/२ तास गार पाण्यात भिजवून ठेवा म्हणजे ओव्हनमध्ये बेक करताना जळणार नाहीत.
२) मॅरीनेशनसाठीचे सर्व साहित्य एकत्र करून त्यात पनीरचे दिड इंचाचे तुकडे करून १५ मिनीटे मॅरीनेट करून ठेवावे.
३) भोपळी मिरच्यांचे १ इंचाचे चौकोनी तुकडे करावे. कांदे जर किंचीत मोठे असतील तर त्यांची साले काढून अर्धे करून घ्यावेत.
४) भाज्या चिरून झाल्या कि स्क्युअरमध्ये प्रथम एक टोमॅटो ओवून घ्यावा. नंतर २-४ तुकडे भाज्या आणि १ तुकडा पनीर असे ओवून सर्वात शेवटी परत टोमॅटो ओवावा. असे सर्व स्क्युअर्स तयार करून घ्यावे. (वरील प्रमाणाला ३ ते ४ स्क्युअर्स लागतील.)
५) ओव्हन ब्रोईलवर २ ते ३ मिनीटे प्रिहीट करावे. तोवर भाज्यांना तेल+मसाला मिश्रणाचे ब्रशिंग करावे. २ टेस्पून तेल, १/२ टिस्पून धणेपूड, १/२ टिस्पून जिरेपूड, १/२ टिस्पून लाल तिखट, चिमूटभर मिठ, चिमूटभर कसूरी मेथी असे साहित्य एकत्र करून भाज्यांना अलगद हाताने किंवा पेस्ट्री ब्रशने लावावे.
६) तयार स्क्युअर्स ओव्हनसेफ प्लेटला तेल लावून त्यावर ठेवावे (मी बिडाचा तवा वापरला होता) आणि साधारण २ ते ४ मिनीटे बेक करावे. खुपवेळ ब्रोईल करू नये त्यामुळे पनीर वितळते. पनीर आणि भाज्या थोड्या ब्राऊन झाल्या कि ओव्हन बंद करून लगेच बाहेर काढाव्यात.
६) स्क्युअर्स वरील भाज्या आणि पनीर हलक्या हाताने प्लेटमध्ये काढाव्यात आणि त्यावर गरमागरम टीक्का मसाला घालून सर्व्ह करावे.
टीप:
१) पनीर बेक करण्यासाठी त्याला थोडा घट्टपणा आणावा लागतो. म्हणून पनीर घरी बनवताना त्यात थोडा मैदा घालावा. पनीर बनवले कि आधी पनीर गाळून घेतल्यावर फडक्यातच पिळावे म्हणजे अधिकचे पाणी निघून जाईल. पनीर एका ताटलीत काढावे. या पनीरच्या चुर्यात २ ते ३ चमचे मैदा घालून थोडे मळावे. खुप मळू नये, आपल्याला फक्त मैदा सर्व पनीरला लावायचा आहे. मळल्यावर परत फडक्यात गच्च बांधून, वरती जड वस्तू ठेवून पनीरची वडी बनण्यासाठी सेट करावे.
२) पनीरचे तुकडे खुपवेळ मॅरीनेट करू नयेत. मऊ पडतात आणि बेक केल्यावर वितळतात.
३) जर ओव्हन नसेल तर मॅरीनेट पनीर तळून घ्यावे किंवा शालो फ्राय करावे आणि भाज्यांना तेल लावून कढईत मोठ्या आचेवर २ मिनीटे परतावे. पण बेक करून किंवा तंदूरमध्ये भाजून चव खुप छान येते.
४) पनीरचे तुकडे जरा मोठेच ठेवावे कारण लहान तुकडे स्क्युअरमध्ये ओवताना तुटतात.
Labels:
Paneer Tikka Masala, Punjabi Paneer Tikka recipe, Tikka Paneer recipe


Thursday, November 19, 2009
Instant Vegetable Pickle
Instant vegetable pickle in Marathi
Yield: approx 1 and 1/2 cup
Time: 20 minutes
 Ingredients:
1 cup carrots, small pieces (1 cm)
1/2 cup cauliflower, very small florets
1/4 cup Green Peas
1 tsp Salt or to taste
1 and 1/2 tsp red Chili powder
1/2 tsp Turmeric powder
1/4 tsp Asafoetida
4 to 5 Fenugreek seeds
1/4 + 1/4 tsp Mustard Seeds
1 tbsp Lemon juice
1 tsp Oil
Method:
1) In a mixing bowl, add carrots, cauliflower and green pea. Add salt, red chili powder, turmeric powder, asafoetida powder and mix well. Grind 1/4 tsp mustard seeds coarsely and add it to the mixture.
2) Heat oil in a small saucepan (eg. egg pan). Add fenugreek seeds and let it become little brown. Remove from oil with a spoon, keep aside. In that hot oil, temper 1/4 tsp mustard seeds, let it crackle and transfer it to a small glass bowl to cool down.
3) Crush the fenugreek seeds and add it to vegetable mixture. Add prepared tadka to the mixture and mix well.
4) Finally, add lemon juice and mix nicely.
This pickle is ready to serve. It will stay fresh for 5-6 days in refrigerator.
Yield: approx 1 and 1/2 cup
Time: 20 minutes
Ingredients:1 cup carrots, small pieces (1 cm)
1/2 cup cauliflower, very small florets
1/4 cup Green Peas
1 tsp Salt or to taste
1 and 1/2 tsp red Chili powder
1/2 tsp Turmeric powder
1/4 tsp Asafoetida
4 to 5 Fenugreek seeds
1/4 + 1/4 tsp Mustard Seeds
1 tbsp Lemon juice
1 tsp Oil
Method:
1) In a mixing bowl, add carrots, cauliflower and green pea. Add salt, red chili powder, turmeric powder, asafoetida powder and mix well. Grind 1/4 tsp mustard seeds coarsely and add it to the mixture.
2) Heat oil in a small saucepan (eg. egg pan). Add fenugreek seeds and let it become little brown. Remove from oil with a spoon, keep aside. In that hot oil, temper 1/4 tsp mustard seeds, let it crackle and transfer it to a small glass bowl to cool down.
3) Crush the fenugreek seeds and add it to vegetable mixture. Add prepared tadka to the mixture and mix well.
4) Finally, add lemon juice and mix nicely.
This pickle is ready to serve. It will stay fresh for 5-6 days in refrigerator.
भाज्यांचे इंस्टंट लोणचे - Instant vegetable Pickle
Instant Vegetable Pickle in English
साधारण दिड कप
वेळ: २० मिनीटे
साहित्य:
१ कप गाजराचे छोटे तुकडे
१/२ कप कॉलिफ्लॉवरचे एकदम छोटे तुकडे
१/४ कप मटाराचे दाणे
१ टिस्पून मिठ किंवा चवीनुसार
दिड टिस्पून लाल तिखट
१/२ टिस्पून हळद
१/४ टिस्पून हिंग
४ ते ५ मेथीचे दाणे
१/४ + १/४ टिस्पून मोहरी
१ लिंबाचा रस
२ टिस्पून तेल
कृती:
१) गाजर, कॉलिफ्लॉवर, मटार एकत्र करावेत. त्यात मिठ, लाल तिखट, हळद, हिंग, एकत्र करावे. १/४ टिस्पून मोहरीची भरडसर पावडर करून मिक्स करावी.
२) तेल गरम करून त्यात मेथी दाणे गुलाबी रंगावर तळून घ्यावे. मेथीदाणे बाजूला काढून त्याच तेलात १/४ टिस्पून मोहरी घालून फोडणी करावी. हि फोडणी गार झाली कि लोणच्यामध्ये घालावी.
३) तळलेले मेथीदाणे खलबत्त्यात कुटून घ्यावे आणि लोणच्यात मिक्स करावे.
४) लिंबाचा रस घालून मिक्स करावे.
हे लोणचे लगेच खाण्यासाठी छान लागते. फ्रिजमध्ये ४-६ दिवस सहज टिकते.
Label:
Instant vegetable pickle, Indian pickle recipe
साधारण दिड कप
वेळ: २० मिनीटे
साहित्य:१ कप गाजराचे छोटे तुकडे
१/२ कप कॉलिफ्लॉवरचे एकदम छोटे तुकडे
१/४ कप मटाराचे दाणे
१ टिस्पून मिठ किंवा चवीनुसार
दिड टिस्पून लाल तिखट
१/२ टिस्पून हळद
१/४ टिस्पून हिंग
४ ते ५ मेथीचे दाणे
१/४ + १/४ टिस्पून मोहरी
१ लिंबाचा रस
२ टिस्पून तेल
कृती:
१) गाजर, कॉलिफ्लॉवर, मटार एकत्र करावेत. त्यात मिठ, लाल तिखट, हळद, हिंग, एकत्र करावे. १/४ टिस्पून मोहरीची भरडसर पावडर करून मिक्स करावी.
२) तेल गरम करून त्यात मेथी दाणे गुलाबी रंगावर तळून घ्यावे. मेथीदाणे बाजूला काढून त्याच तेलात १/४ टिस्पून मोहरी घालून फोडणी करावी. हि फोडणी गार झाली कि लोणच्यामध्ये घालावी.
३) तळलेले मेथीदाणे खलबत्त्यात कुटून घ्यावे आणि लोणच्यात मिक्स करावे.
४) लिंबाचा रस घालून मिक्स करावे.
हे लोणचे लगेच खाण्यासाठी छान लागते. फ्रिजमध्ये ४-६ दिवस सहज टिकते.
Label:
Instant vegetable pickle, Indian pickle recipe
Tuesday, November 17, 2009
Spinach Soup / Palak Soup
Spinach Soup in Marathi
Serves: 3 persons
Time: 25 minutes
 Ingredients:
2 medium bunch of Spinach
1 small Onion, finely chopped
1 small garlic clove, slightly crushed
1 small green chili, slit (optional)
1 tsp Butter
Pinch of Cinnamon powder / 1 small Cinnamon stick
Salt to taste
Black pepper
2 tbsp heavy cream
Method:
1) Remove the stems and clean the spinach. Wash and blanch. Drain the water and puree.
2) Heat 1 tsp butter. If you are using cinnamon stick, add it now and saute for few seconds.
3) Add garlic clove and green chili. saute for 30 seconds. Add finely chopped Onion and saute until translucent.
4) Add spinach puree and boil over medium heat. Add salt to taste, pinch of cinnamon powder.
Sprinkle little black pepper, garnish with heavy cream and serve hot.
Note:
1) Add 1/2 cup milk or 1/4 cup heavy cream for creamy taste and texture. Add it to grinder while blending spinach.
2) For thick consistency, use 1 tbsp Rice flour or Maida. Do not add directly. First, mix it with 2 tbsp water and then add it to soup. Boil for few minutes over medium-low heat.
Serves: 3 persons
Time: 25 minutes
Ingredients:2 medium bunch of Spinach
1 small Onion, finely chopped
1 small garlic clove, slightly crushed
1 small green chili, slit (optional)
1 tsp Butter
Pinch of Cinnamon powder / 1 small Cinnamon stick
Salt to taste
Black pepper
2 tbsp heavy cream
Method:
1) Remove the stems and clean the spinach. Wash and blanch. Drain the water and puree.
2) Heat 1 tsp butter. If you are using cinnamon stick, add it now and saute for few seconds.
3) Add garlic clove and green chili. saute for 30 seconds. Add finely chopped Onion and saute until translucent.
4) Add spinach puree and boil over medium heat. Add salt to taste, pinch of cinnamon powder.
Sprinkle little black pepper, garnish with heavy cream and serve hot.
Note:
1) Add 1/2 cup milk or 1/4 cup heavy cream for creamy taste and texture. Add it to grinder while blending spinach.
2) For thick consistency, use 1 tbsp Rice flour or Maida. Do not add directly. First, mix it with 2 tbsp water and then add it to soup. Boil for few minutes over medium-low heat.
पालक सूप - Spinach Soup
Spinach Soup in English
३ जणांसाठी
वेळ: २५ मिनीटे
साहित्य:
२ मध्यम पालक जुड्या
१ लहान कांदा, बारीक चिरून
१ लहान लसूण पाकळी, थोडीशी ठेचून
१ लहान हिरवी मिरची, उभी चिरून
१ टिस्पून बटर
चिमूटभर दालचिनीपूड / १ लहान दालचिनीची काडी
चवीपुरते मिठ
काळी मिरी
२ टेस्पून हेवी क्रिम
कृती:
१) पालक निवडून घ्यावा, पाने खुडून घ्यावीत. धुवून ब्लांच करावा. ब्लांच करण्यासाठी पालकाची खुडलेली पाने गरम पाण्यात २ मिनीटे उकळावीत. गरम पाण्यातून काढून थंड पाण्यात घालावीत. सर्व पाणी काढून टाकून मिक्सरमध्ये प्युरी करून घ्यावी.
२) जर आख्खी दालचिनी असेल तर १ टिस्पून बटरमध्ये दालचिनीची काडी घालून थोडावेळ परतावे.
३) लसूण आणि हिरवी मिरची घालून साधारण ३० सेकंद परतावे. बारीक चिरलेला कांदा घालून गोल्डन ब्राऊन होईस्तोवर परतावा.
४) पालकाची प्युरी घालून उकळी काढावी. चवीपुरते मिठ घालावे. जर आख्खी दालचिनी सुरूवातीला घातली नसेल तर थोडी दालचिनीपूड घातली तरी चालते, ती आत्ता घालावी.
थोडी मिरपूड भुरभूरावी आणि थोडे हेवी क्रिम घालून सूप सर्व्ह करावे.
टीप:
१) जर सूपला छान क्रिमी टेस्ट आणि टेक्स्चर हवे असेल तर पालकची प्युरी करताना मिक्सरमध्ये १/२ कप दूध किंवा १/४ कप हेवी क्रिम घालावे म्हणजे सूप उकळताना दुध फुटणार नाही
२) सूपला घट्टपणा येण्यासाठी १ चमचा तांदूळ पिठ किंवा मैदा थोड्या पाण्यात मिक्स करून सूपमध्ये घालून सूप थोडावेळ उकळावे.
३ जणांसाठी
वेळ: २५ मिनीटे
साहित्य:२ मध्यम पालक जुड्या
१ लहान कांदा, बारीक चिरून
१ लहान लसूण पाकळी, थोडीशी ठेचून
१ लहान हिरवी मिरची, उभी चिरून
१ टिस्पून बटर
चिमूटभर दालचिनीपूड / १ लहान दालचिनीची काडी
चवीपुरते मिठ
काळी मिरी
२ टेस्पून हेवी क्रिम
कृती:
१) पालक निवडून घ्यावा, पाने खुडून घ्यावीत. धुवून ब्लांच करावा. ब्लांच करण्यासाठी पालकाची खुडलेली पाने गरम पाण्यात २ मिनीटे उकळावीत. गरम पाण्यातून काढून थंड पाण्यात घालावीत. सर्व पाणी काढून टाकून मिक्सरमध्ये प्युरी करून घ्यावी.
२) जर आख्खी दालचिनी असेल तर १ टिस्पून बटरमध्ये दालचिनीची काडी घालून थोडावेळ परतावे.
३) लसूण आणि हिरवी मिरची घालून साधारण ३० सेकंद परतावे. बारीक चिरलेला कांदा घालून गोल्डन ब्राऊन होईस्तोवर परतावा.
४) पालकाची प्युरी घालून उकळी काढावी. चवीपुरते मिठ घालावे. जर आख्खी दालचिनी सुरूवातीला घातली नसेल तर थोडी दालचिनीपूड घातली तरी चालते, ती आत्ता घालावी.
थोडी मिरपूड भुरभूरावी आणि थोडे हेवी क्रिम घालून सूप सर्व्ह करावे.
टीप:
१) जर सूपला छान क्रिमी टेस्ट आणि टेक्स्चर हवे असेल तर पालकची प्युरी करताना मिक्सरमध्ये १/२ कप दूध किंवा १/४ कप हेवी क्रिम घालावे म्हणजे सूप उकळताना दुध फुटणार नाही
२) सूपला घट्टपणा येण्यासाठी १ चमचा तांदूळ पिठ किंवा मैदा थोड्या पाण्यात मिक्स करून सूपमध्ये घालून सूप थोडावेळ उकळावे.
Saturday, November 14, 2009


Thursday, November 12, 2009
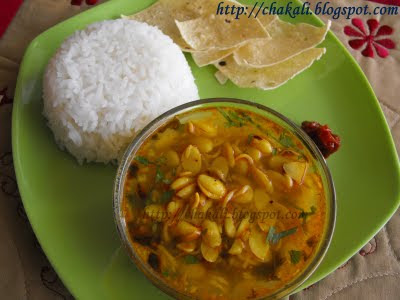
Maharashtrian Dalimbi Amti
Dalimbi Amti in Marathi
Serves: 2 to 3 persons
Time: 15 minutes
 Ingredients:
1 cup sprouted and cleaned Beans
1 tbsp Oil
1/4 cup Dry Coconut, shredded
1/2 tsp Cumin seeds, for dry roasting
1/2 tsp Cumin seeds, for tempering
1/8 tsp Asafoeitda
1/4 tsp Turmeric
1/2 tsp red chili powder
3-4 curry leaves
2 tbsp Cilantro, for garnishing
2 Kokum pieces
1 tsp Jaggery or 1 tsp Sugar
salt to taste
Method:
1) Dry roast coconut over medium heat until nice brown in color. saute while roasting otherwise coconut could burn. Crush roasted coconut with hand. Dry roast cumin seeds over medium low heat until you sense nice aroma. Once cumin seeds are nicely toasted. Crush them coarsely.
2) Beans are very delicate. So steam cook Beans slightly by adding little salt. Do not cook them too much otherwise they will break. We need them whole. Take 1/4 cup of cooked beans into a bowl crush them a little, so that curry will come together nicely.
3) Heat a saucepan. Add oil and wait until it becomes hot. Temper with cumin seeds, asafoeitda, Turmeric, Red chili powder and curry leaves. Now add crushed and whole beans. Add a cup of water. Also add Kokum, roasted n crushed cumin and coconut. Simmer over medium heat for 2 minutes. Add water if required to adjust consistency. Then add Jaggery and cook for 2-3 minutes more. Also add salt if needed. Simmer over low heat for few minutes. Garnish with Cilantro
Serve hot with white Rice.
Tips:
1) You can use green chilies instead of red chili powder.
2) Usually, I mash 50% of cooked Dalimbi before adding to tempering. I kept them whole only to show them in the photo.
3) You can use fresh grated coconut along with dry coconut.
Serves: 2 to 3 persons
Time: 15 minutes
Ingredients:1 cup sprouted and cleaned Beans
1 tbsp Oil
1/4 cup Dry Coconut, shredded
1/2 tsp Cumin seeds, for dry roasting
1/2 tsp Cumin seeds, for tempering
1/8 tsp Asafoeitda
1/4 tsp Turmeric
1/2 tsp red chili powder
3-4 curry leaves
2 tbsp Cilantro, for garnishing
2 Kokum pieces
1 tsp Jaggery or 1 tsp Sugar
salt to taste
Method:
1) Dry roast coconut over medium heat until nice brown in color. saute while roasting otherwise coconut could burn. Crush roasted coconut with hand. Dry roast cumin seeds over medium low heat until you sense nice aroma. Once cumin seeds are nicely toasted. Crush them coarsely.
2) Beans are very delicate. So steam cook Beans slightly by adding little salt. Do not cook them too much otherwise they will break. We need them whole. Take 1/4 cup of cooked beans into a bowl crush them a little, so that curry will come together nicely.
3) Heat a saucepan. Add oil and wait until it becomes hot. Temper with cumin seeds, asafoeitda, Turmeric, Red chili powder and curry leaves. Now add crushed and whole beans. Add a cup of water. Also add Kokum, roasted n crushed cumin and coconut. Simmer over medium heat for 2 minutes. Add water if required to adjust consistency. Then add Jaggery and cook for 2-3 minutes more. Also add salt if needed. Simmer over low heat for few minutes. Garnish with Cilantro
Serve hot with white Rice.
Tips:
1) You can use green chilies instead of red chili powder.
2) Usually, I mash 50% of cooked Dalimbi before adding to tempering. I kept them whole only to show them in the photo.
3) You can use fresh grated coconut along with dry coconut.
डाळींबी आमटी - Dalimbi Amti
Dalimbi Amti in English
२ ते ३ जणांसाठी
वेळ: १५ मिनीटे
साहित्य:
१ कप मोड आलेले आणि सोललेले वाल
१ टेस्पून तेल
१/४ कप सुके खोबरे, किसून
१/२ टिस्पून जिरे, भाजण्यासाठी
१/२ टिस्पून जिरे, फोडणीसाठी
१/८ टिस्पून हिंग
१/४ टिस्पून हळद
१/२ टिस्पून तिखट
३-४ कढीपत्ता पाने
२ टिस्पून कोथिंबीर
२ आमसुलं
१ टिस्पून गूळ किंवा १ टिस्पून साखर
चवीपुरते मिठ
कृती:
१) किसलेले सुके खोबरे खरपूस भाजून घ्यावे. जिरे खमंग भाजावे. भाजलेले खोबरे हातानेच चुरून घ्यावे. भाजलेले जिरे खलबत्त्यात कुटून घ्यावे.
२) डाळींब्या मिठ घालून अगदी किंचीत वाफवून घ्याव्यात. पुर्ण लगदा होवू देवू नये. वाफवलेल्या डाळींब्यातील थोड्या डाळींब्या चेचून घ्याव्यात.
३) पातेल्यात तेल गरम करावे. जिरे, हिंग, हळद, तिखट आणि कढीपत्ता घालून फोडणी करावी. त्यात डाळींब्या घालाव्यात. कपभर पाणी घालावेत. आमसुलं घालावीत. कुटलेले जिरे आणि भाजलेले खोबरे घालावे. मध्यम आचेवर २ मिनीटे उकळी काढावी. पातळपणासाठी गरजेनुसार पाणी घालावे. नंतर गूळ घालून १-२ मिनीटे उकळी काढावी. गरज वाटल्यास मिठ घालावे. एकदम मंद आच ठेवून थोडावेळ झाकण ठेवून आमटी मुरू द्यावी. कोथिंबीर घालून सजवावे.
गरमागरम तूपभाताबरोबर हि आमटी मस्त लागते.
टीप:
१) मी शिजवलेल्या डाळींब्या ५०% चेचून घेते आणि थोडया आख्ख्या ठेवते म्हणजे आमटी छान मिळून येते. फक्त फोटोत डाळींब्या दिसाव्यात म्हणून आख्ख्या ठेवल्या आहेत.
Labels:
Dalimbyanchi Amti, Dalimbi Amti
२ ते ३ जणांसाठी
वेळ: १५ मिनीटे
साहित्य:१ कप मोड आलेले आणि सोललेले वाल
१ टेस्पून तेल
१/४ कप सुके खोबरे, किसून
१/२ टिस्पून जिरे, भाजण्यासाठी
१/२ टिस्पून जिरे, फोडणीसाठी
१/८ टिस्पून हिंग
१/४ टिस्पून हळद
१/२ टिस्पून तिखट
३-४ कढीपत्ता पाने
२ टिस्पून कोथिंबीर
२ आमसुलं
१ टिस्पून गूळ किंवा १ टिस्पून साखर
चवीपुरते मिठ
कृती:
१) किसलेले सुके खोबरे खरपूस भाजून घ्यावे. जिरे खमंग भाजावे. भाजलेले खोबरे हातानेच चुरून घ्यावे. भाजलेले जिरे खलबत्त्यात कुटून घ्यावे.
२) डाळींब्या मिठ घालून अगदी किंचीत वाफवून घ्याव्यात. पुर्ण लगदा होवू देवू नये. वाफवलेल्या डाळींब्यातील थोड्या डाळींब्या चेचून घ्याव्यात.
३) पातेल्यात तेल गरम करावे. जिरे, हिंग, हळद, तिखट आणि कढीपत्ता घालून फोडणी करावी. त्यात डाळींब्या घालाव्यात. कपभर पाणी घालावेत. आमसुलं घालावीत. कुटलेले जिरे आणि भाजलेले खोबरे घालावे. मध्यम आचेवर २ मिनीटे उकळी काढावी. पातळपणासाठी गरजेनुसार पाणी घालावे. नंतर गूळ घालून १-२ मिनीटे उकळी काढावी. गरज वाटल्यास मिठ घालावे. एकदम मंद आच ठेवून थोडावेळ झाकण ठेवून आमटी मुरू द्यावी. कोथिंबीर घालून सजवावे.
गरमागरम तूपभाताबरोबर हि आमटी मस्त लागते.
टीप:
१) मी शिजवलेल्या डाळींब्या ५०% चेचून घेते आणि थोडया आख्ख्या ठेवते म्हणजे आमटी छान मिळून येते. फक्त फोटोत डाळींब्या दिसाव्यात म्हणून आख्ख्या ठेवल्या आहेत.
Labels:
Dalimbyanchi Amti, Dalimbi Amti
Tuesday, November 10, 2009
Tadka Dal Fry
Dal Tadka in Marathi
Time: 10 minutes (Excluding pressure-cooking dal)
Serves: 3 to 4 persons
For some , dal fry and dal tadka are different. But mostly restaurants serve them nearly in the same style. For Dal Tadka, usually dal is prepared and then Tadka is poured on the dal. This method leaves a thin oil layer and aromatic fried garlic flavor to the dal. Dal Fry is usually prepared in 'dal' way, that is, first preparing tadka with onion and tomatoes and then frying dal in the tadka. Unlike Dal Tadka, it does not have tadka poured on it.
Frankly, both varieties are delicious and the line between both, if any, is very thin.
 Ingredients:
3/4 cup Toor Dal
1/4 cup Chana Dal
1 medium Onion (1/2 chopped finely, 1/2 sliced lengthwise)
1 medium Tomato, finely chopped
2 Garlic cloves, slightly crushed
1 Green chili, slit
2 dried Red Chilies
3 tsp Ghee
1/8 tsp Mustard Seeds (optional), Pinch of Asafoetida, 1/4 tsp Turmeric powder
1/2 tsp cumin seeds
3 to 4 Curry leaves
1 tsp Lemon Juice (Optional)
Salt to taste
 Method:
1) Pressure cook Toor dal and Chana Dal until soft and mushy (Atleast 7 to 8 whistles). Whisk dals to blend it.
2) Deep fry 1/2 Onion (sliced lengthwise) until brown and crispy. We are going to use it for garnishing.
3) Heat 1 tsp Ghee into a pan. Add Mustard seeds, let them crackle. Add Asafoetida, Turmeric powder, 2 curry leaves, green chili and finely chopped onion. Saute until onion becomes golden brown. Add chopped tomatoes, saute until mushy.
4) Add whisked dal and some water to adjust the consistency. Add salt to taste and let the dal boil for few minutes. Before transfering dal tadka into serving bowl, add some lemon juice to give tangy hint.
5) Transfer dal to serving kadai/ bowl. Heat a small pan (usually used for tadka-tempering). Add 1 tsp ghee, cumin seeds. Let the cumin splutter. Add curry leaves, crushed garlic. Let the garlic become little golden in color. Add red chilies, stir gently and pour it over dal.
Garnish with Cilantro (optional) and fried onion. Serve hot with any kind of subtle Rice - Some Rice Recipes.
Tips:
1) Add 1/2 tsp garam masala to spice up the dal.
Time: 10 minutes (Excluding pressure-cooking dal)
Serves: 3 to 4 persons
For some , dal fry and dal tadka are different. But mostly restaurants serve them nearly in the same style. For Dal Tadka, usually dal is prepared and then Tadka is poured on the dal. This method leaves a thin oil layer and aromatic fried garlic flavor to the dal. Dal Fry is usually prepared in 'dal' way, that is, first preparing tadka with onion and tomatoes and then frying dal in the tadka. Unlike Dal Tadka, it does not have tadka poured on it.
Frankly, both varieties are delicious and the line between both, if any, is very thin.
Ingredients:3/4 cup Toor Dal
1/4 cup Chana Dal
1 medium Onion (1/2 chopped finely, 1/2 sliced lengthwise)
1 medium Tomato, finely chopped
2 Garlic cloves, slightly crushed
1 Green chili, slit
2 dried Red Chilies
3 tsp Ghee
1/8 tsp Mustard Seeds (optional), Pinch of Asafoetida, 1/4 tsp Turmeric powder
1/2 tsp cumin seeds
3 to 4 Curry leaves
1 tsp Lemon Juice (Optional)
Salt to taste
Method:1) Pressure cook Toor dal and Chana Dal until soft and mushy (Atleast 7 to 8 whistles). Whisk dals to blend it.
2) Deep fry 1/2 Onion (sliced lengthwise) until brown and crispy. We are going to use it for garnishing.
3) Heat 1 tsp Ghee into a pan. Add Mustard seeds, let them crackle. Add Asafoetida, Turmeric powder, 2 curry leaves, green chili and finely chopped onion. Saute until onion becomes golden brown. Add chopped tomatoes, saute until mushy.
4) Add whisked dal and some water to adjust the consistency. Add salt to taste and let the dal boil for few minutes. Before transfering dal tadka into serving bowl, add some lemon juice to give tangy hint.
5) Transfer dal to serving kadai/ bowl. Heat a small pan (usually used for tadka-tempering). Add 1 tsp ghee, cumin seeds. Let the cumin splutter. Add curry leaves, crushed garlic. Let the garlic become little golden in color. Add red chilies, stir gently and pour it over dal.
Garnish with Cilantro (optional) and fried onion. Serve hot with any kind of subtle Rice - Some Rice Recipes.
Tips:
1) Add 1/2 tsp garam masala to spice up the dal.
दाल तडका - Dal Tadka
Dal Takda in English
काही जणांना, दाल तडका आणि दाल फ्राय वेगवेगळे वाटते. पण, बर्याचशा रेस्टोरेंटमध्ये हे दोन्ही सारख्याच पद्धतीने बनवतात. दाल तडकामध्ये, डाळ बनवून वरून फोडणी घालतात. या फोडणीत लसूण आणि कढीपत्ता घातल्याने तेलाचा सुगंधित तवंग डाळीवर राहतो. दाल फ्रायमध्ये आधी फोडणी तयार करून त्यात कांदा, टोमॅटो परतून त्यावर डाळ फोडणीस घालतात. दाल तडक्याप्रमाणे दाल फ्रायमध्ये वरून फोडणी घालत नाहीत.
दोन्ही प्रकार खुपच चविष्ट लागतात तसेच दोन्हीमध्ये अगदीच थोडा फरक आहे
३ ते ४ जणांसाठी
वेळ: १० मिनीटे (शिजवलेली डाळ तयार असल्यास)
साहित्य:
३/४ कप तूर डाळ
१/४ कप चणा डाळ
१ मध्यम कांदा (१/२ बारीक चिरून, १/२ उभा पातळ चिरून)
१ मध्यम टोमॅटो, बारीक चिरून
२ लसणीच्या पाकळ्या, किंचीत ठेचून
१ हिरवी मिरची, उभी चिरून
२ सुक्या लाल मिरच्या
३ टिस्पून तूप (२ टिस्पून डाळीच्या फोडणीस + १ टिस्पून वरून फोडणी)
१/८ टिस्पून मोहोरी, चिमूटभर हिंग, १/४ टिस्पून हळद,
१/२ टिस्पून जिरे
३ ते ४ कढीपत्ता पाने
१ टिस्पून लिंबाचा रस (ऐच्छिक)
चवीपुरते मिठ
कृती:
१) तूरडाळ आणि चणाडाळ प्रेशर कूकरमध्ये मऊसर शिजवून घ्यावी. व्यवस्थित शिजली कि घोटून घ्यावी.
२) उभा चिरलेला कांदा तेलात खरपूस तळून घ्यावा. तळलेला कांदा डाळीत छान लागतो. हा कांदा सजावटीसाठी वापरावा.
३) पातेल्यात २ टिस्पून तूप गरम करावे. त्यात मोहोरी घालावी, तडतडू द्यावी. त्यात हिंग, हळद, २ कढीपत्त्याची पाने, हिरवी मिरची आणि बारीक चिरलेला कांदा घालावा. गोल्डन ब्राऊन रंगावर परतावा. टोमॅटो घालून मऊसर होईस्तोवर परतावे.
४) नंतर घोटलेली डाळ घालावी आणि गरजेपुरते पाणी घालावे. दाल तडका थोडा घट्टसरच असतो त्यामुळे पाणी बेताचे घालावे. चवीपुरते मिठ घालून उकळी येऊ द्यावी. जर लिंबूरस घालणार असाल तर तो आत्त घालून ढवळावे.
५) डाळ सर्व्हींग बोलमध्ये काढावी. कढल्यात १ टिस्पून तूप गरम करावे त्यात जिरे, कढीपत्ता, आणि लसूण घालावी. लसूण जरा लालसर झाली कि लाल मिरची टाकून फोडणी तयार करावी आणि ही फोडणी तयार डाळीवर घालावी. कोथिंबीर आणि तळलेल्या कांद्याने सजवून भाताबरोबर गरमागरम सर्व्ह करावी.
Labels:
Dal Tadka, Dal Fry, tadka dal
काही जणांना, दाल तडका आणि दाल फ्राय वेगवेगळे वाटते. पण, बर्याचशा रेस्टोरेंटमध्ये हे दोन्ही सारख्याच पद्धतीने बनवतात. दाल तडकामध्ये, डाळ बनवून वरून फोडणी घालतात. या फोडणीत लसूण आणि कढीपत्ता घातल्याने तेलाचा सुगंधित तवंग डाळीवर राहतो. दाल फ्रायमध्ये आधी फोडणी तयार करून त्यात कांदा, टोमॅटो परतून त्यावर डाळ फोडणीस घालतात. दाल तडक्याप्रमाणे दाल फ्रायमध्ये वरून फोडणी घालत नाहीत.
दोन्ही प्रकार खुपच चविष्ट लागतात तसेच दोन्हीमध्ये अगदीच थोडा फरक आहे
३ ते ४ जणांसाठी
वेळ: १० मिनीटे (शिजवलेली डाळ तयार असल्यास)
साहित्य:३/४ कप तूर डाळ
१/४ कप चणा डाळ
१ मध्यम कांदा (१/२ बारीक चिरून, १/२ उभा पातळ चिरून)
१ मध्यम टोमॅटो, बारीक चिरून
२ लसणीच्या पाकळ्या, किंचीत ठेचून
१ हिरवी मिरची, उभी चिरून
२ सुक्या लाल मिरच्या
३ टिस्पून तूप (२ टिस्पून डाळीच्या फोडणीस + १ टिस्पून वरून फोडणी)
१/८ टिस्पून मोहोरी, चिमूटभर हिंग, १/४ टिस्पून हळद,
१/२ टिस्पून जिरे
३ ते ४ कढीपत्ता पाने
१ टिस्पून लिंबाचा रस (ऐच्छिक)
चवीपुरते मिठ
कृती:१) तूरडाळ आणि चणाडाळ प्रेशर कूकरमध्ये मऊसर शिजवून घ्यावी. व्यवस्थित शिजली कि घोटून घ्यावी.
२) उभा चिरलेला कांदा तेलात खरपूस तळून घ्यावा. तळलेला कांदा डाळीत छान लागतो. हा कांदा सजावटीसाठी वापरावा.
३) पातेल्यात २ टिस्पून तूप गरम करावे. त्यात मोहोरी घालावी, तडतडू द्यावी. त्यात हिंग, हळद, २ कढीपत्त्याची पाने, हिरवी मिरची आणि बारीक चिरलेला कांदा घालावा. गोल्डन ब्राऊन रंगावर परतावा. टोमॅटो घालून मऊसर होईस्तोवर परतावे.
४) नंतर घोटलेली डाळ घालावी आणि गरजेपुरते पाणी घालावे. दाल तडका थोडा घट्टसरच असतो त्यामुळे पाणी बेताचे घालावे. चवीपुरते मिठ घालून उकळी येऊ द्यावी. जर लिंबूरस घालणार असाल तर तो आत्त घालून ढवळावे.
५) डाळ सर्व्हींग बोलमध्ये काढावी. कढल्यात १ टिस्पून तूप गरम करावे त्यात जिरे, कढीपत्ता, आणि लसूण घालावी. लसूण जरा लालसर झाली कि लाल मिरची टाकून फोडणी तयार करावी आणि ही फोडणी तयार डाळीवर घालावी. कोथिंबीर आणि तळलेल्या कांद्याने सजवून भाताबरोबर गरमागरम सर्व्ह करावी.
Labels:
Dal Tadka, Dal Fry, tadka dal
Thursday, November 5, 2009
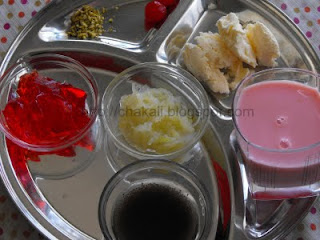
Falooda
Falooda in Marathi
Servings: 4
Time: 10 minutes (If all ingredients are ready to serve)

 Ingredients:
8 scoops of Vanilla Icecream
1/2 cup Rooh afza Rose syrup
2 tbsp Sabja seeds (Falooda Seeds)
2 to 3 cups cold Milk
2 tbsp dry fruits, crushed
1 packet Falooda Sevai
1 cup Strawberry flavored Jelly
Some Cherries for garnishing
 Method:
1) Set jelly into refrigerator atleast 5 hours before serving, just follow the instructions on the packet.
2) Soak 2 tbsp Sabja seeds for 2 hours into 1/2 cup water.
3) Heat 1 liter water, let it boil. Add Falooda sevai and cook it for 4 to 5 minutes. drain out hot water and transfer cooked sevai into cold water.
4) Mix Milk and rose Syrup. Add little more rose syrup, if needed.
5) Take 4 glasses, First add 1 tbsp soaked sabja seeds, jelly pieces, cooked sevai, milk, 1 scoop Ice-cream and little more jelly again. Add mixture of rose syrup and milk. Place a scoop of Vanilla ice-cream. Garnish with dry fruits and cherry. Serve immediately. Insert 1 straw and spoon while serving.
Tips:
1) Add a layer of some sweet and sour fruits like grapes, pineapple chunks, strawberry to Falooda. It will taste good and make it more attractive.
Servings: 4
Time: 10 minutes (If all ingredients are ready to serve)
 Ingredients:
8 scoops of Vanilla Icecream
1/2 cup Rooh afza Rose syrup
2 tbsp Sabja seeds (Falooda Seeds)
2 to 3 cups cold Milk
2 tbsp dry fruits, crushed
1 packet Falooda Sevai
1 cup Strawberry flavored Jelly
Some Cherries for garnishing
 Method:
1) Set jelly into refrigerator atleast 5 hours before serving, just follow the instructions on the packet.
2) Soak 2 tbsp Sabja seeds for 2 hours into 1/2 cup water.
3) Heat 1 liter water, let it boil. Add Falooda sevai and cook it for 4 to 5 minutes. drain out hot water and transfer cooked sevai into cold water.
4) Mix Milk and rose Syrup. Add little more rose syrup, if needed.
5) Take 4 glasses, First add 1 tbsp soaked sabja seeds, jelly pieces, cooked sevai, milk, 1 scoop Ice-cream and little more jelly again. Add mixture of rose syrup and milk. Place a scoop of Vanilla ice-cream. Garnish with dry fruits and cherry. Serve immediately. Insert 1 straw and spoon while serving.
Tips:
1) Add a layer of some sweet and sour fruits like grapes, pineapple chunks, strawberry to Falooda. It will taste good and make it more attractive.
फालूदा - Falooda
Falooda in English
वाढणी ४ जणांसाठी
वेळ: १० मिनीटे (साहित्य तयार असल्यास)
साहित्य:
८ स्कूप्स वेनिला आईसक्रिम
१/२ कप रूह अफ्जा रोझ सिरप
२ टेस्पून सब्जा बी
२ ते ३ कप थंड दूध
२ टेस्पून ड्राय फ्रुट्स, छोटे तुकडे
१ पॅकेट फालूदा शेवया
१ कप स्ट्रॉबेरी फ्लेवरची जेली
४ टेस्पून टूटी-फ्रुटीचे तुकडे
सजावटीसाठी चेरी
कृती:
१) फालूदा बनवायच्या किमान ५ तास आधी जेली बनवून फ्रिजमध्ये सेट करण्यास ठेवावी. जेली बनवण्यासाठी जेली पावडर आणून पाकीटावरील कृती वाचून जेली बनवावी.
२) सब्जा बी फालूदा बनवण्याच्या किमान २ ते ४ तास आधीच १/२ कप पाण्यात भिजवून ठेवाव्यात.
३) १ लिटर पाणी उकळवावे त्यात फालूदाच्या शेवया घालून ४ ते ५ मिनीटे शिजवाव्यात. गरम पाणी काढून टाकावे व थंड पाणी घालून दुसर्या भांड्यात थंड पाण्यासकट ठेवून द्यावे.
४) दुध आणि रोझ सिरप मिक्स करून घ्यावे. गोडपणा जर कमी वाटत असेल तर अजून थोडे रोझ सिरप घालावे. ढवळून तयार ठेवावे.
५) फालूदा बनवायच्या वेळेस ४ ग्लास घ्यावे . त्यात भिजवलेले सब्जा बी, जेली, शिजवलेल्या शेवया, आईसक्रिमचा १ स्कूप, दुध आणि परत त्यावर १ स्कूप वेनिला आईसक्रिम घालावे. ड्रायफ्रुट्स आणि चेरीने सजवावे. लगेच सर्व्ह करावे. सर्व्ह करताना ग्लासमध्ये १ स्ट्रॉ आणि चमचा घालून द्यावा.
टीप:
१) फालुदाच्या मधल्या लेयरमध्ये स्ट्रॉबेरी, द्राक्षं, अननसाचे तुकडे इत्यादी आंबटगोड चवीची फळे घातल्यास फालुदा दिसायला आकर्षक तसेच चवीला स्वादिष्ट लागतो.
Labels:
Falooda, Indian Dessert, Phalooda
वाढणी ४ जणांसाठी
वेळ: १० मिनीटे (साहित्य तयार असल्यास)
साहित्य:
८ स्कूप्स वेनिला आईसक्रिम
१/२ कप रूह अफ्जा रोझ सिरप
२ टेस्पून सब्जा बी
२ ते ३ कप थंड दूध
२ टेस्पून ड्राय फ्रुट्स, छोटे तुकडे
१ पॅकेट फालूदा शेवया
१ कप स्ट्रॉबेरी फ्लेवरची जेली
४ टेस्पून टूटी-फ्रुटीचे तुकडे
सजावटीसाठी चेरी
कृती:१) फालूदा बनवायच्या किमान ५ तास आधी जेली बनवून फ्रिजमध्ये सेट करण्यास ठेवावी. जेली बनवण्यासाठी जेली पावडर आणून पाकीटावरील कृती वाचून जेली बनवावी.
२) सब्जा बी फालूदा बनवण्याच्या किमान २ ते ४ तास आधीच १/२ कप पाण्यात भिजवून ठेवाव्यात.
३) १ लिटर पाणी उकळवावे त्यात फालूदाच्या शेवया घालून ४ ते ५ मिनीटे शिजवाव्यात. गरम पाणी काढून टाकावे व थंड पाणी घालून दुसर्या भांड्यात थंड पाण्यासकट ठेवून द्यावे.
४) दुध आणि रोझ सिरप मिक्स करून घ्यावे. गोडपणा जर कमी वाटत असेल तर अजून थोडे रोझ सिरप घालावे. ढवळून तयार ठेवावे.
५) फालूदा बनवायच्या वेळेस ४ ग्लास घ्यावे . त्यात भिजवलेले सब्जा बी, जेली, शिजवलेल्या शेवया, आईसक्रिमचा १ स्कूप, दुध आणि परत त्यावर १ स्कूप वेनिला आईसक्रिम घालावे. ड्रायफ्रुट्स आणि चेरीने सजवावे. लगेच सर्व्ह करावे. सर्व्ह करताना ग्लासमध्ये १ स्ट्रॉ आणि चमचा घालून द्यावा.
टीप:
१) फालुदाच्या मधल्या लेयरमध्ये स्ट्रॉबेरी, द्राक्षं, अननसाचे तुकडे इत्यादी आंबटगोड चवीची फळे घातल्यास फालुदा दिसायला आकर्षक तसेच चवीला स्वादिष्ट लागतो.
Labels:
Falooda, Indian Dessert, Phalooda
Monday, November 2, 2009
October 2009 Recipes
October 2009 Recipes
पनीर फ्रँकी - Paneer Frankie
ड्रायफ्रुट करंजी - Baked Dryfruit Karanji
बेसन लाडू - Besan Ladu
शेव - Sev
रवा बेसन लाडू - Rava Besan Ladu
चिंचगूळाची भेंडी - Chinch-gulachi Bhendi
भाजणीचे थालिपीठ - Bhajani Thalipith
October 2008 Recipes
पनीर वेजिटेबल पिझ्झा - Paneer Vegetable Pizza
दिवाळी फराळ - Diwali Faral
सोया ग्रान्युअल्स कटलेट - Soya Granules Cutlet
दही वडा - Dahi Wada
October 2007 Selected recipes
फ्राईड नूडल्स विथ आईसक्रिम - Fried Noodles with Icecream
आलू पराठा - Aloo Paratha
पेढा - Pedha
वेजिटेबल कटलेट - Vegetable Cutlet
Comment of the month Oct. 2009 from Nilima:
vidu tai tumcchi recipe chaan aahe. mi baryach wela ha halwa kelay chaan zhala aani ho pedha tips badel dhanyawad karen nehmich khavyacha prashn padto ho pedha aagdi sopay ues karyala thx agen me halwyat koya badel milkmade use kele mast zhlela :) aage aajun ek hya halwyat zar khaycha green color waparla ki mast disto halwa try karun paha :)
Subscribe to:
Posts (Atom)